|
STAGE BY STAGE |
|
Essential
Supplies
The items you will need to complete this scene are as
follows:-
|
 |
|
|
|
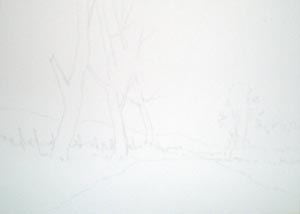
As you will see in this first image I have done a very simple outline
pencil drawing. Then I then stuck on my sky wash.
|
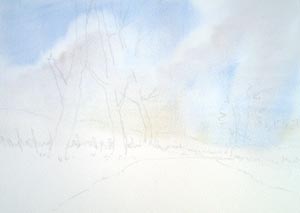
Using firstly ultramarine blue, as a very weak wash, using a 1.5"
flat synthetic brush. Then add a tiny touch of yellow ochre into the
bottom areas of the sky. Wash out my brush, squeeze out surplus water
and simply suck out the clouds areas. Then in the bottom of the clouds
drop in a very weak mixture of ultramarine blue and light red.
|
|
|
|
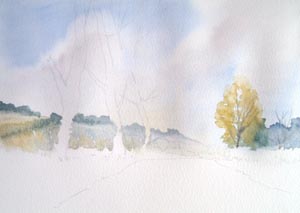
In the next stage you will see that I have dropped in the distant hills,
and for this again I have used a mixture of ultramarine blue and light
red very very weak and this is done whilst the sky is slightly damp. For
a few of the highlighted fields to the left, I used a mixture of Hooker's
green with yellow ochre and for that I used my ¾" wash brush. I used a
brush called the Sapphire which is a very handy mix of sable and
synthetic, so has the best properties of both types of brush. Those of
you who watch me on TV, will know that I only ever carry four brushes: the
big one that I put the sky on with (1.5" Dalon), and the 3 Sapphire
brushes that I use (3/4" wash brush, the No.8 round and the rigger
brush).
You will notice that the hills I have painted are a very soft
distant type, with a murky look to them, this is simply because the paper is
still damp and the paint starts to spread giving the appearance of
distance.
For the middle distance and trees on the right-hand side, I
have used firstly on the extreme right, a mixture of ultramarine blue
and light red, and then the same mixture with a hint of Hooker's green to
make it slightly stronger. Then Hooker's green and
yellow ochre mixed, which is a lovely spring time green. But at this
stage of course I don’t want it to be too strong, so lots of water in and
simply daub on with my No.8 round brush. For the feel of a few twigs
I used the same ultramarine blue and light red mix, but this time using
my rigger brush.
|
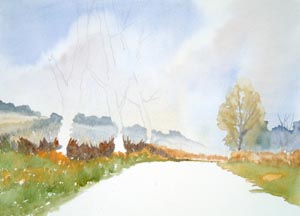
For the hedgerow to the right-hand side and to the left, I have used a ¾"
wash brush and stroked on with the side of the brush with yellow ochre
and a very light stroke, so that I can leave tiny touches of white paper
sparkling through here and there. For the grass area underneath the
hedge on the right, I firstly go on with yellow ochre then Hooker's green
and yellow on top, all whilst it's still wet, leaving little bits of my
yellow ochre showing through here and there. For all of this I used my ¾"
wash brush.
Now using a mixture of ultramarine blue and raw umber I put in the
darker shaded areas of grass, using my No.8 round brush. Simply drop
in darker areas which will eventually be in the shadow.
Interspersed amongst all this, and again using my yellow ochre followed
by my yellow ochre and Hooker's green mixture, we have different
colours all over the place, rather than just blocks of green. All this
is done whilst the colours are still wet, notice as well little bits of
white paper sparkling through here and there because I always use a
rough surface paper you can take advantage of the surface by stroking
over lightly and these little bits of white add extra light.
|
|
|
|
Now in the trees I'm using my round brush for all of them and mixtures
of yellow ochre, raw umber and ultramarine blue and burnt sienna, mixed
very dark. But in order to get a rounded look to my tree trunk rather
than a flat look, I need to make sure that all the colours are going on
whilst the first colour is still wet, that wet the colours run into each
other so that there are no sharp edges where one colour meets the next.
Incidentally I never ever use a manufactured black, whenever you use a
manufactured black, you kill the areas stone dead. There are two ways of
mixing black in my colour system, ultramarine blue and burned sienna or
alizarin crimson and Hooker's green.
For little bits of detail in my tree trunk or twigs coming out, I've
again used my ultramarine blue and burnt sienna mix, but this time used
my rigger brush.
For the furthest away of the three trees, I've just used a weaker mixture of my
ultramarine blue and burnt sienna mix, the reason being as it's further
away I don’t want as much detail in it.
For the bits of foliage I've again used yellow ochre and Hooker's green
and daubed on very lightly with my No.8 round brush. Notice I'm not
painting individual leaves, simply tapping on here and there giving the
impression of a canopy of leaves. A little hint of ultramarine blue and
light red under some of the leaf areas, because remember, shadow gives a
picture life.
|
For my path area I used a mixture of yellow ochre with a tiny touch of
light red into it. And stroked over very lightly with my ¾" flat wash
brush, by stroking over very lightly I can leave little bits of white paper
sparkling through, and now it's time for the scary bit, the shadows. This
is the bit that pulls the whole painting together but uniting one side
of the picture with the other.
You have a very cool shadow or a warmer shadow depending of the mood of
the picture. For a cooler shadow I would use my mixture of ultramarine
blue and burnt sienna but for this warm shadow I am using a mixture of
ultramarine blue and alizarin crimson to make a fairly awful purple and
then tone down this colour with a hint of burnt sienna.
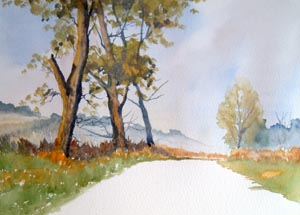
And there we are, a finished picture. Personally, I think it's the best
time of the year. |
|