|
STAGE BY STAGE |
|
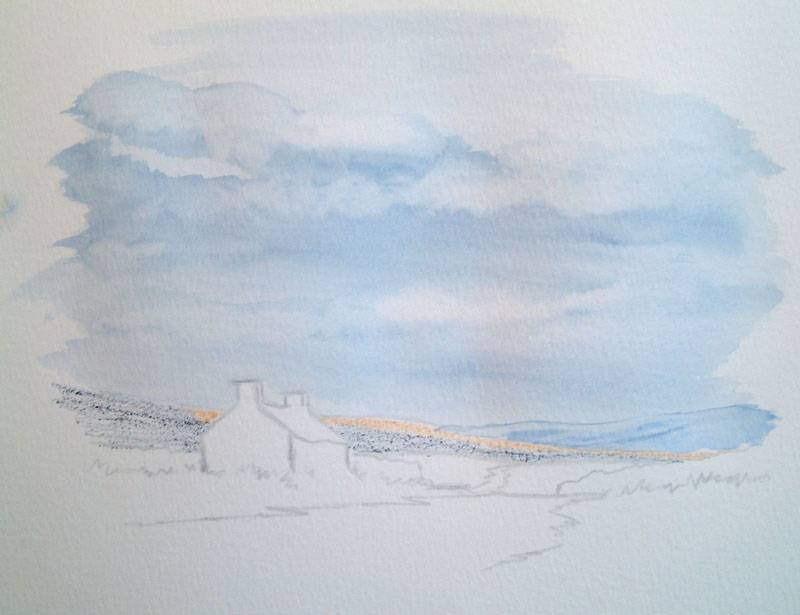
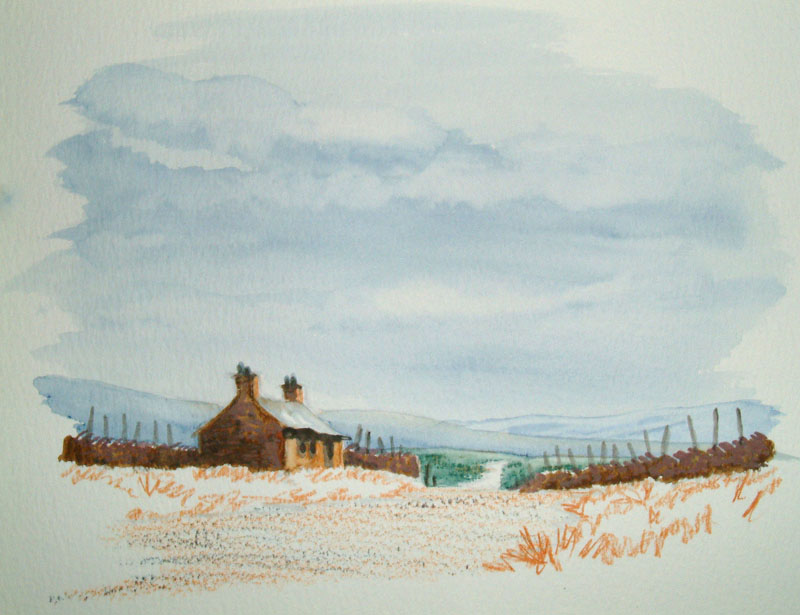
This one is quite a famous picture
really, the original was the main story for a couple of episodes of
'Emmerdale' a few years ago. The original was a watercolour painting and
it's an old shepherd’s cottage high on the moors in Northumberland, a
place called Elsdon.
|
Essential
Supplies
The items you will need to complete this scene are as
follows:-
|
 |
|
|
|
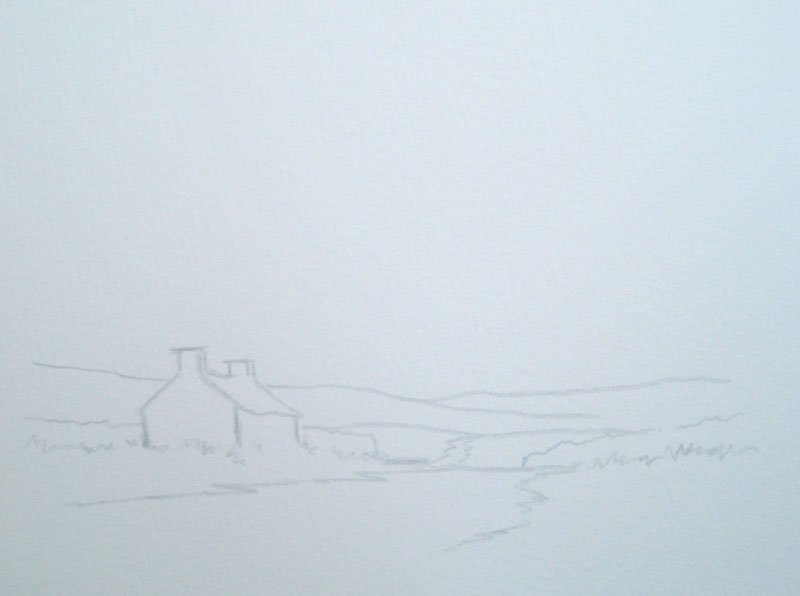
As you can see yet again a very simple
outline drawing using my cool grey. All I’ve got is the cottage, a couple
of dry-stone walls, one either side, the patch creating the recession,
into this end the path must be much wider in the foreground than it is
in the middle distance where it vanishes to reappear again as a couple
of little squiggly lines in the middle distance, followed by a few
middle distance hills and the grasses underneath the building which
again are a couple of squiggly lines.
|
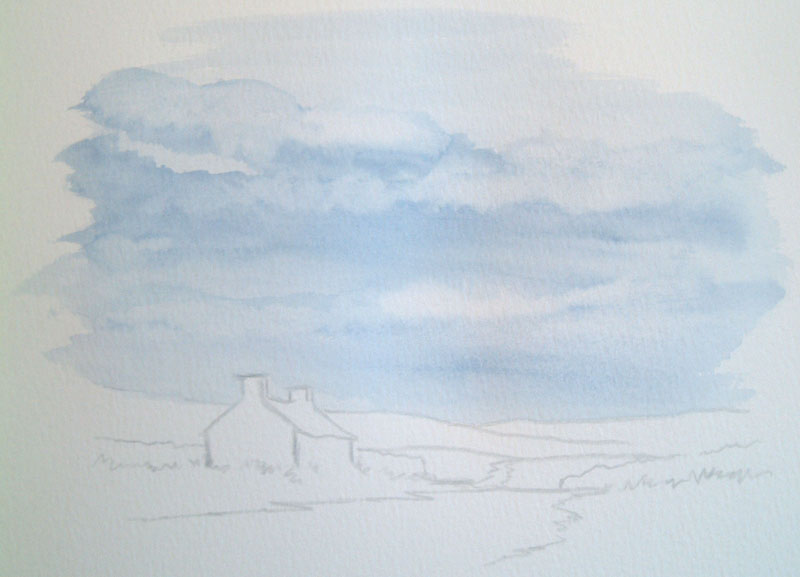
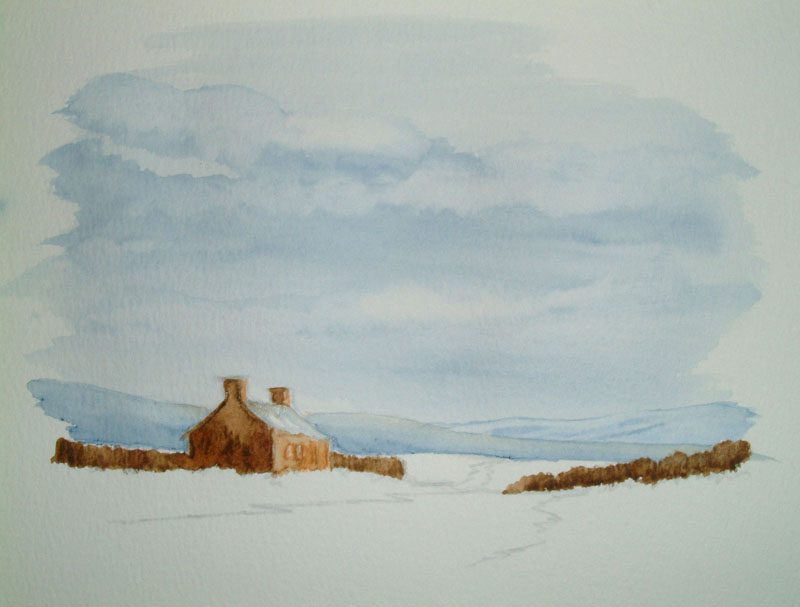
This time slightly differently I am going
to do the sky first. I want a slightly darker sky on this one as well. I
am using a little bit of indigo taking the paint off the pencil using
my ¾" wash brush. As in any watercolour you need to be fairly quick
with this bit, because it is drying on you the moment you start to
paint. You can add one or two darker clouds by taking more paint off the
pencil.
This time I’m going to wash out my paint and just as in a watercolour
sky, suck out some clouds on top of the darker bits that I have just
added. There we go a fairly big impressive sky with the minimum of
effort.
|
|
|
|
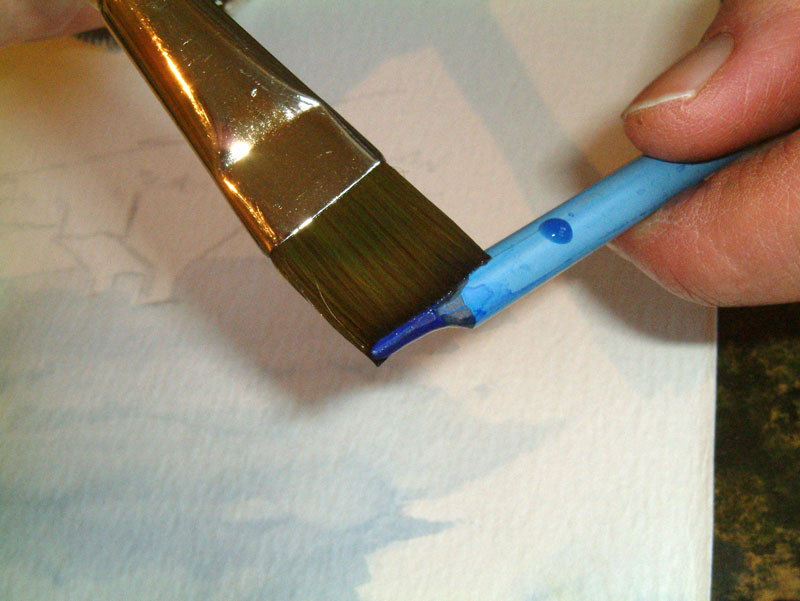
Now with a tiny touch of French
ultramarine blue, again stroking the paint off the pencil using my ¾" wash
brush, simply fill in the first distant hill, making sure this is not too
dark otherwise you’ll bring it further forward and remember, leave a few
light areas to give you a little bit of undulation so it's not lying
flat.
|
For the next hill I am actually drawing on a little bit of indigo, which
is of course the blue that I used in the sky. |
|
|
|
Simply squiggling filling the nearer
distant hill, but this time I’ve left a little bit of white paper so
that now I can stroke in with a touch of raw sienna which at the moment
looks really patchy until of course I stroke over with my No.8 round
brush, plenty of water and merge these colours together and now we have
a hill slightly darker in tone meaning slightly nearer, but the raw
sienna catching a little hint of light in the top, quite convincingly.
|
|
Remember the more you mess about
with this painting the tighter and stiffer with less movement and
softness, keep it simple in other words. Also notice at this stage I'm
building this picture up slightly differently using drawing on
techniques and washing on techniques coming slightly further foreword
and adding the water as I go rather than just adding the water to a
completed drawing.
|
|
|
|
Now for the cottage and I am using Vandyke
brown for the darker sides just filling in, scribbling in. Remember there
are rough grasses as the base of the cottage and the dry-stone wall, so
don’t worry about having a sharp base or a sharp edge to your cottage.
Speaking of a dry-stone wall, if you are up on the moors and you’ve got a
dry-stone wall next to an old stone cottage, it is more than likely that
they are made of the same stone, so keep the colours the same, I’m just
blocking in the cottage and the wall with Vandyke brown to start with.
Notice however in this picture that I have left the right-hand side of
the cottage uncoloured as also with the chimney. Notice also that I
have left the tops of the dry-stone wall with white paper showing on the
top. This is going to help me capture a little bit of light eventually.
Remember watercolours, there is no purer white than the white in the
paper.
The reason why I have left these areas uncoloured is because now I am
filling in with raw sienna and a tiny touch of the Vandyke brown on top
of that. This will give me a lighter brown for the light side of the
cottage. |
Now with my No.8 round brush wet the
colours. I'm stroking in from the cottage into the dry-stone wall as
well. Remember at this stage you are painting this not building it, so
don’t do it stone-by-stone, you give the impression of stonework in a
few minutes.
Whilst I’m wetting this still with my No.8 round brush, I take a little
bit of blue-grey off the pencil to fill in the roof of the building. And
again I have left a few tiny touches of the white paper showing through
here and there.
|
|
|
|
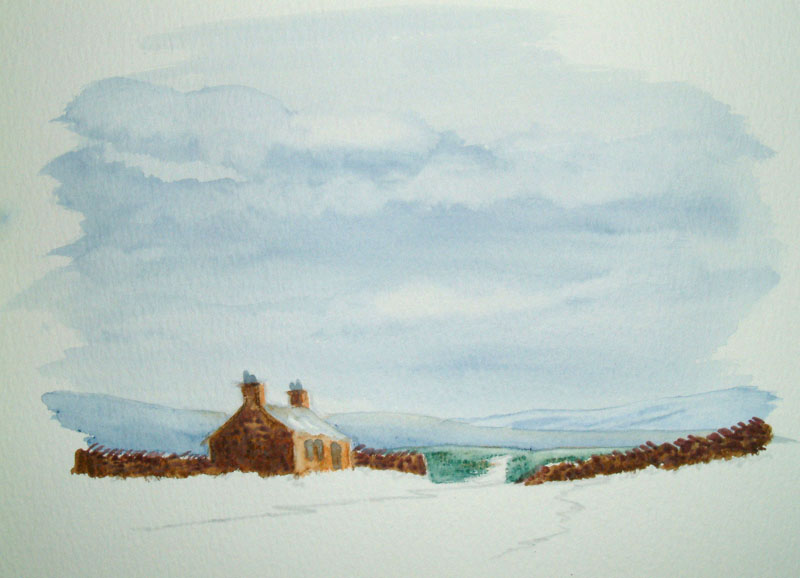
Now to the middle distance hills and I’m
using a little bit of Hooker's green dark, scribbling it in with a few
touches of raw sienna here and there to highlight. Notice that I’m
leaving the path in the distance uncoloured. Now with my No.8 round brush
simply stipple on so that there are a few bits left unpainted. Giving a
feeling of a little bit more undulation and to create a little bit of
recession, simply wash out the brush, squeeze out and take a little
strip of paint out on the top line to give a little bit more light. |
Now taking a little touch of blue-grey on
the point of my No.8 round brush a couple of dots here and
there to represent windows and a door for my building. And also a couple
of strokes on top of the chimneys with the same colours which are my
chimney pots. Now for a little bit of blue-grey mixed with light red,
I’m taking this off the pencil with my wet brush and I’m mixing this on
the paintbrush changing from one pencil to the other and then simply
stipple onto the side wall of the cottage giving the effect of stonework,
but it is also quite a nice warm colour also a little bit of this
into the dry-stone wall. At this stage, a few diagonal strokes with the
point of my round brush on top of the dry-stone wall, will give me my
coping stones. Remember you have got two dry-stone walls, so the same
effect on the other side of the path.
Now for the first time a little bit of black and I'm putting a big dark
line underneath the roof where it joins the building. Also a couple of
little touches underneath the top parts of the chimney stacks, basically
wherever you may have an overhang.
|
|
|
|
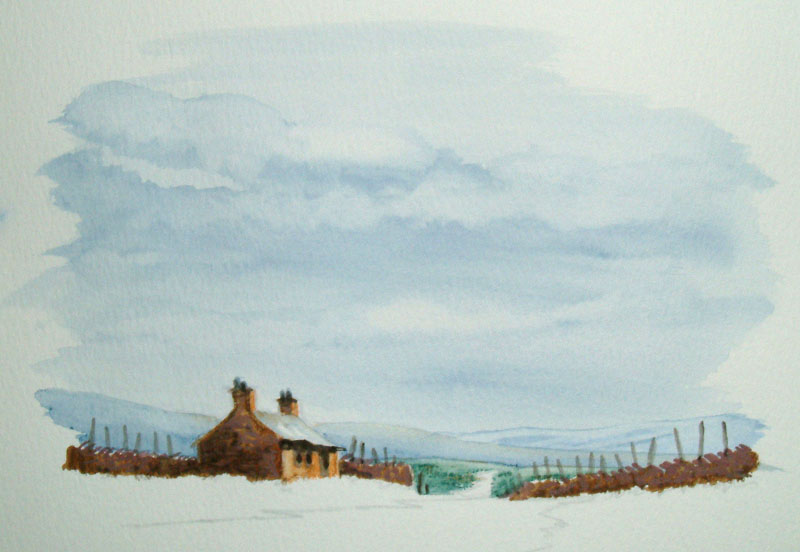
Whilst I’m in with the black, a few sticks
on top of the dry-stone wall getting shorter as they go further away
will aid my recession and for this again I have used black. |
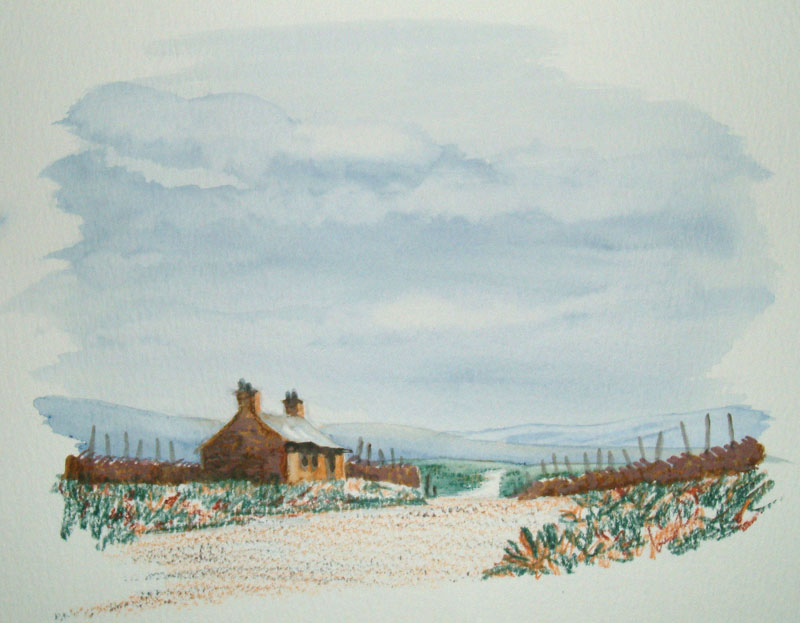
So now into the foreground areas starting with the path, firstly into the
path I am just squiggling in with a bit of raw sienna followed by a
little bit of my blue-grey on top of the burnt sienna, lightly colouring
using the side of the pencil. But notice at this stage I haven’t painted
in the path in the far distance. Also into the grassy areas with these
two colours, starting off with a little bit of raw sienna |
|
|
|
Now into these same grass areas with a bit
of my Hooker's green dark and a few touches of light red here and there.
Good and strong remembering again that because this is a pencil the
harder you press on the stronger the colours are going to be. The light
red is always going to warm up areas and remembering it’s a very strong
colour, it's easier to put more in afterwards than try and take it out,
so add carefully. |
|
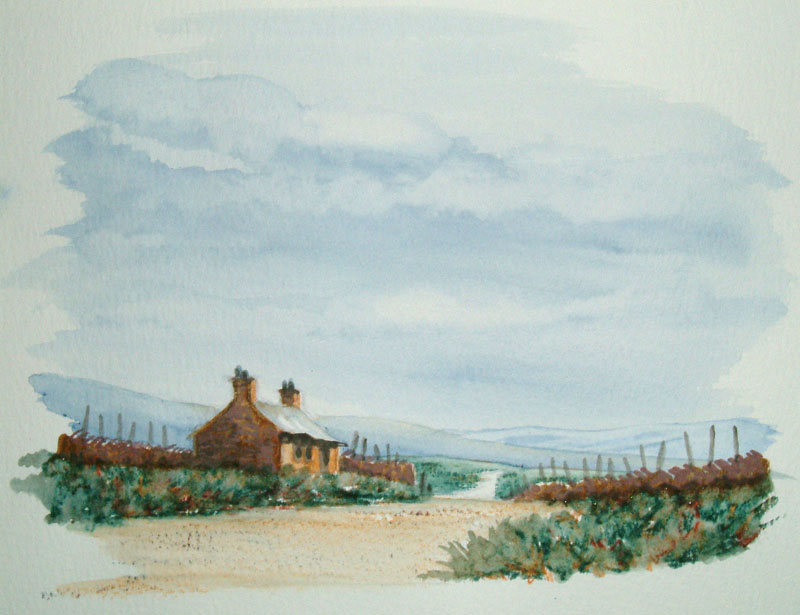
Now it's time for the magic of the water
again, firstly stroking in the pathway and I’m leaving a few touches
unpainted without water, giving a little bit more texture to the path.
When it comes to wetting the green areas, rather than painting on the
water solidly I'm stippling on, this is leaving a few tiny touches of
white paper here and there. I’m leaving some of the colours standing
out, giving me a much more grassy feel. For all of this I am using my No.8
round brush. |
|
|
|
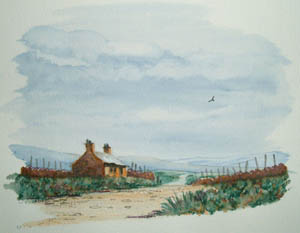
Now for a few hard solid bits here and
there. Firstly, in the path once it has dried I’m just going on with my
black pencil with a few squiggly lines here and there. This will give
the effect of stones or pebbles or whatever in the path, followed by a
few sharp edges of Hooker's green here and there in the grass areas. Also
a little bit of my purple-grey here and there for a few sharp bits. For
the path in the distance if I paint over with a distinct colour I will
lose it at that kind of distance, so just with a wet brush stroke over
picking up a touch other than the initial wash that I put in that area, which is
of course long since dried. This will give a slight tint to the path.
Finally, using my black pencil a tick in the sky will give us a buzzard,
and hey presto 'Emmerdale' recreated. |