|
|
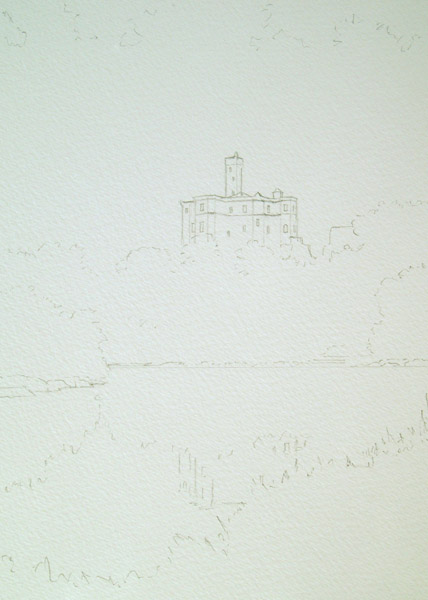
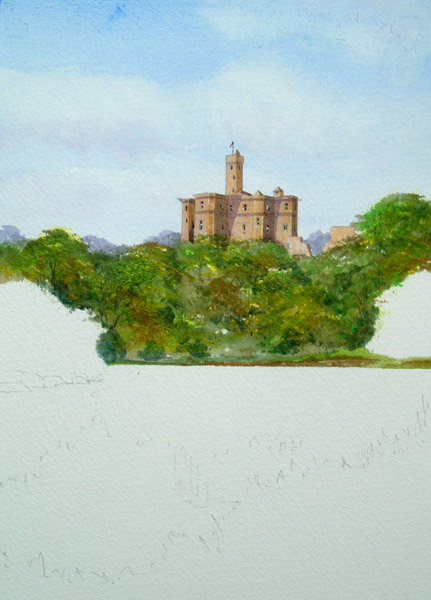
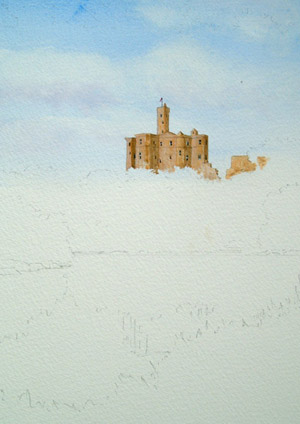
As you can see from the basic outline
drawing, I haven’t fiddled and messed about, it is purely as I say an
outline with any old pencil. I don’t like the fancy heavy pencils
because when you put the paint on they tend to spread and become mucky.
|
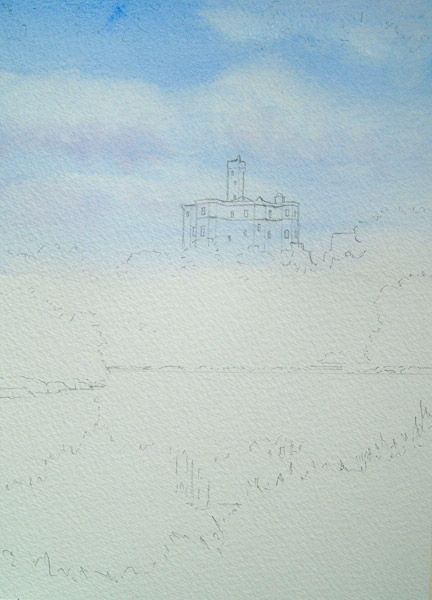
For the sky wash, I pre wet the paper using
a 1.5" wash brush and then go in with a little bit of cobalt blue,
well watered, getting weaker as it comes further down, then drop on top
of this still using the same brush, some titanium white for my clouds
and then a tiny touch of quinacridone violet mixed with my cobalt blue
and my titanium white for a warm colour at the base of the clouds. You
may notice at the top of the sky a bit of a blue blob, but I’m not
worried about that, because I know that's where there are going to be some trees
coming in from the top.
|
|
|
|
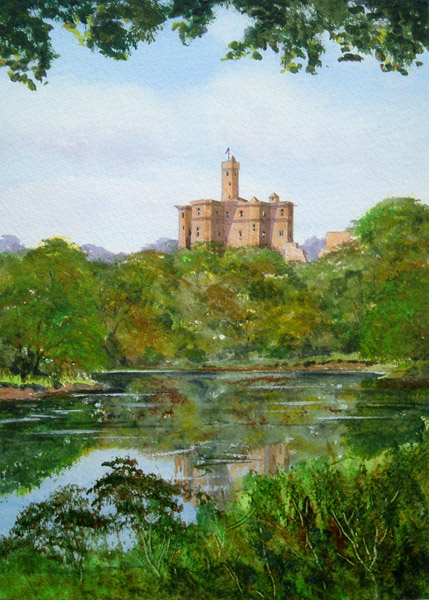
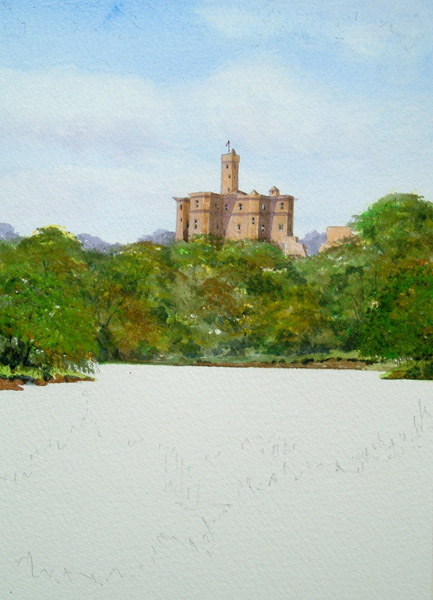
For the castle itself I am using a mixture
of raw sienna with a tiny touch of burnt sienna into it. Incidentally, if
you mix burnt sienna and raw sienna together this gives you half baked
sienna - that was a joke by the way, don’t believe me. Instead it gives
you a great castle colour, I am using my No.8 round brush for all of
this and just blocking in the castle.
For the darker side of the castle I have
added a touch of middle grey to my mix. This is just a darker version of
the stonework, it’s not shadow as such…yet. However, the shadow when
added will bring this whole thing to life.
The beauty of acrylics is you can paint your lights on top of dark just
like you would in oils. And so here and there on the lighter areas I
touched in with a little bit of titanium white. |
There is of course the flagpole to go on
top of the castle; I am filling that in with a single stroke of my No.3
rigger. For the flag a tiny touch of my quinacridone violet. For the
windows I am using a tiny touch of Payne's grey mixed with burnt sienna,
this will give me a rather nice black. Don’t mess about with these
windows, you don’t need to see sash windows and net curtains behind
them, they are just a couple of blobs. Remember no one is going to say
to you, "That can’t be Warkworth Castle because you’ve only got fourteen
windows and the castle has twenty". Anyone who knows, will know by the shape
not the detail.
|
|
|
|
Now for the shadows and for this I am
using a mixture of Payne's grey with a tiny touch of my quinacridone
violet. And it’s the strong shadows which will give this whole thing
life. This mix is quite a warm shadow colour which I just loosely stroke
over the other colours.
|
|
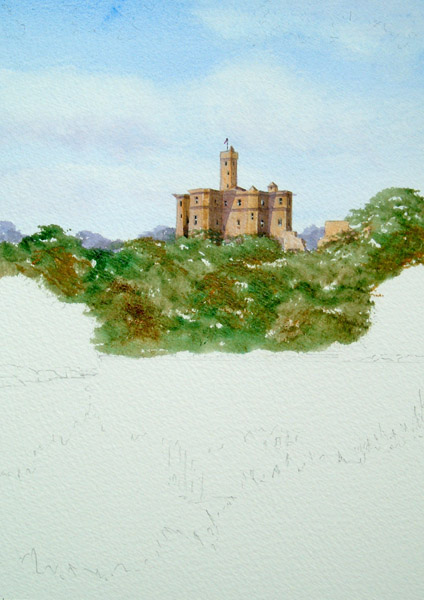
Now it's time for the trees. In this
neck of the woods, pardon the pun, there’s a heck of a lot of them. I’m
starting off firstly with a few trees in the far distance, and for this
strangely enough I am using my quinacridone violet with a touch of cobalt
blue just literally stippling on with my ¾" wash brush. I want to keep
these further away, so no need to mess about, just literally daub it on.
Now moving further forward time to add some serious greens, a little
bit of Hooker's green mixed with burnt sienna. Now with acrylics, these
colours are really strong and chunky so be sure to add plenty of water,
keeping it fairly weak to start with. Again I’m just stippling on with
my 3/4” wash brush ensuring that around the castle areas that I go up
into the castle a little bit, so that I can see a little bit of castle
through the tops of the trees.
Now I’m starting to mix some other colours
into the tops of the greens. Starting off with a little bit of raw
sienna, just a few touches here and there, this is just to break up all
the greens so it's not too samey. Now also a few touches of burnt
sienna, again just stippling on. These are the first colours before I
start and shape them.
|
|
|
|
Now I’ve got my Hooker's green, burnt
sienna and cobalt blue, I am going into the trees with this mix to
denote some shadow in between trees. For the tree trunks a little bit of
Payne's grey with my burnt sienna mix, but make sure you don’t have too
many of these. |
Now for a touch of bright green, and again it’s my 3/4" wash brush
stippling on. Bright green is a lovely vibrant colour, but it does just
as it says on the tube, it's very bright, don’t over cook it. I’ve also
added a tiny touch of cadmium yellow to highlight the lighter areas of
the tree tops.
Now coming further forward into some more distinct trees. For this I am
starting off with some fairly strong Hooker's green and burnt sienna
mixed. Add a little bit of Payne's grey and burnt sienna to add a few
twigs here and there before finally stippling on with a little bit of my
bright green, this time mixed with raw sienna, still using my 3/4" wash
brush. Add a little bit of my bright green for the bank underneath the
bushes. For the base of the banks, a little bit of burnt sienna mixed
with my Payne's grey. |
|
|
|
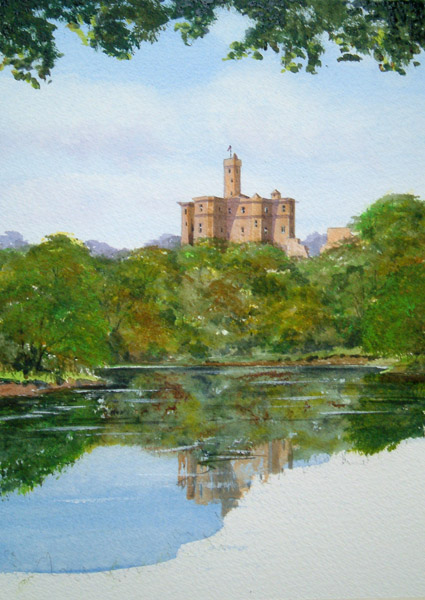
Now it's time for reflections. Basically
just repeat the colours underneath that you have put in on top. But
interestingly enough, I am painting my reflections before I paint the
river, then let this lot dry before going on with the water. |
For the water, once all the reflections have dried I simply stroked over
with cobalt blue mixed with a touch of titanium white, once this has
dried I will be adding a few strokes of stronger white.
I’ve now realised
that I need the reflection a little bit darker on the left-hand side
underneath the bushes. So I am going on with a little bit of cobalt blue
mixed with Payne's grey and the same to the right-hand side. |
|
|
|
Now that’s the main subject done really
all that remains is to frame it, and when I say frame it, I don’t mean
physically put a frame around it, I mean get some nice darks, top and
bottom, to take the eye into the centre of the picture.
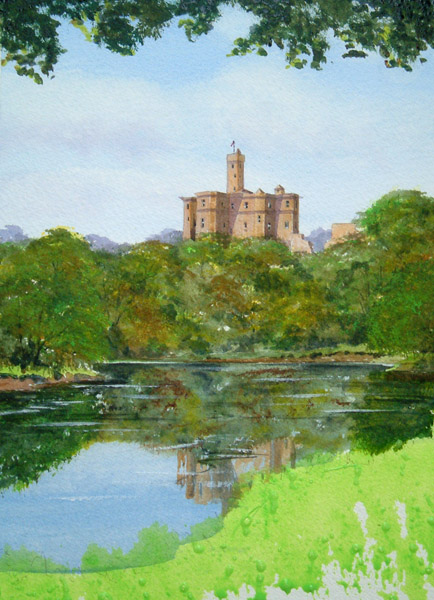
Once my water has dried starting off at the top with a few leaves coming
in from over hanging trees. For this I am going to use all the same
greens I’ve used in the rest of the picture, but a little bit darker and
stronger. I’m going in with my ¾” wash brush with Hooker's green and
burnt sienna, nice and thick and strong. And now you will see what I
meant about the blue blob disappearing in the top of the sky. But don’t
fill it all in, you want to see some sky wash through the gaps, remember
the poor old birds, they will break their necks if they try to fly
through a solid tree.
Into the top parts of this I’m adding
cobalt blue mixed with Payne's grey to make the leaves really dark here
and there. Now a little bit of edging with some lighter green, basically
a little bit of light green mixed with cadmium yellow, just a few
touches. |
Now for the bottom edges, I’m starting off firstly with some
light green. Just look at that, see how wrong it looks. But don’t panic
this gets better as you go in with the other colours, starting off with
burnt sienna and Hooker's green mixed, and whilst that deadly bright
green is still wet, tap in with the darker green.
Whilst this is still
wet, with my rigger brush, we will have the impression of a few plants
growing here and there. For this I am using raw umber mixed with my
Hooker's green. Now a touch of cobalt blue mixed with my Payne's grey
still with my rigger brush a few daubs here and there. A few bits of raw
umber mixed with burnt sienna for a few different colours. Now a little
bit of Hooker's green and burnt sienna good and strong, not a lot of
water in this mix, so that I am just leaving a little bit of the light
green showing through. |
|
|
|
Finally, in the bottom right I am going to have some Payne's grey and
cobalt blue, mixed good and strong and dark down here. Then using my
finger nail just stroking out a few bits and pieces here and there. I
could have painted on with white paint here, but that would have been a
bit too bright. Take off your tape and you have a finished picture. |