|
|
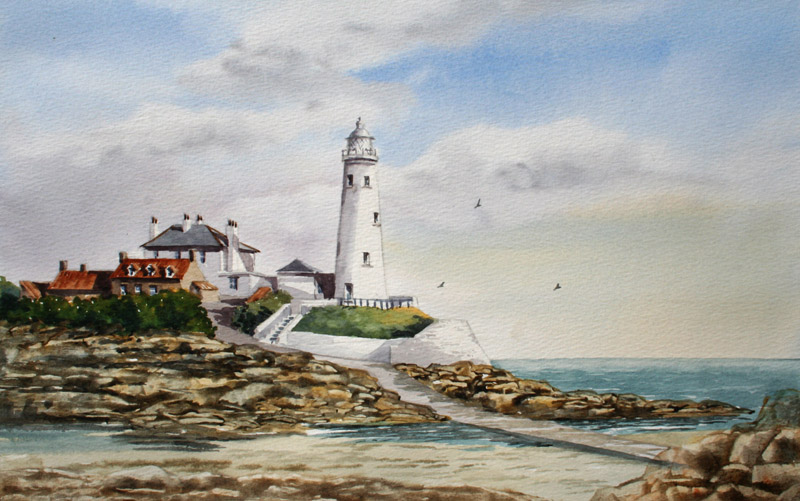
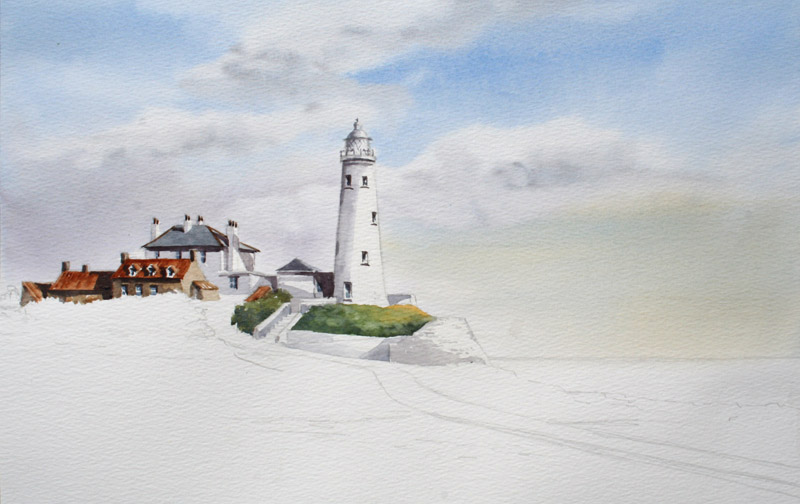
In this first image you will see that I
have done a very basic pencil outline and then into my sky wash, after
masking the areas that I want to keep white, e.g parts of the lighthouse,
with masking fluid. For the sky I firstly pre wet the paper and put on
loads of water and dropped in with a little bit of cobalt blue and
alizarin crimson in the bottom, to add a little bit of warmth. Then
cobalt blue, good and strong, from the top all the way down to the base
of the sky area and suck out those clouds with a damp brush.
In the base
of the clouds I have put in a little bit of cobalt blue with light red
for cloud shadow. Now I let this dry (which didn’t take that long in the
sun) before removing the masking fluid. |
|
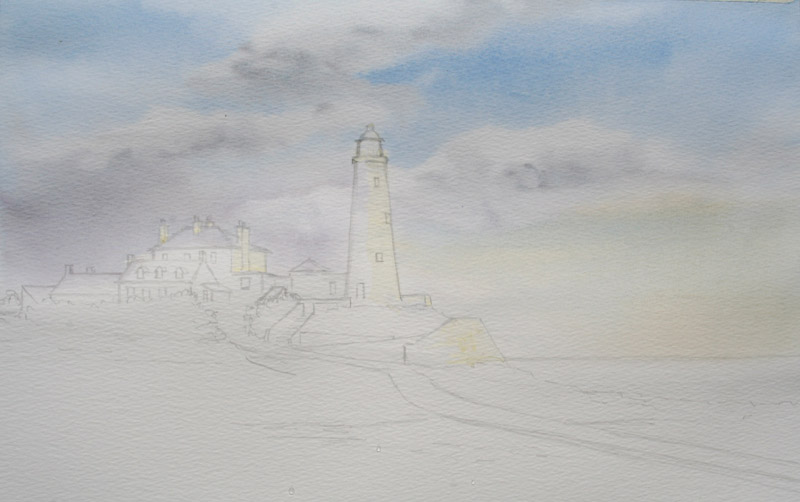
For the shadow in the lighthouse I have
used cobalt blue with a tiny touch of alizarin crimson and burnt sienna
and washed in the shadow areas and the windows using my No.8 round brush
for the bigger bits and my No.3 rigger brush for the smaller bits.
Notice how this dark shadow makes the white areas seem even whiter. |
|
|
|
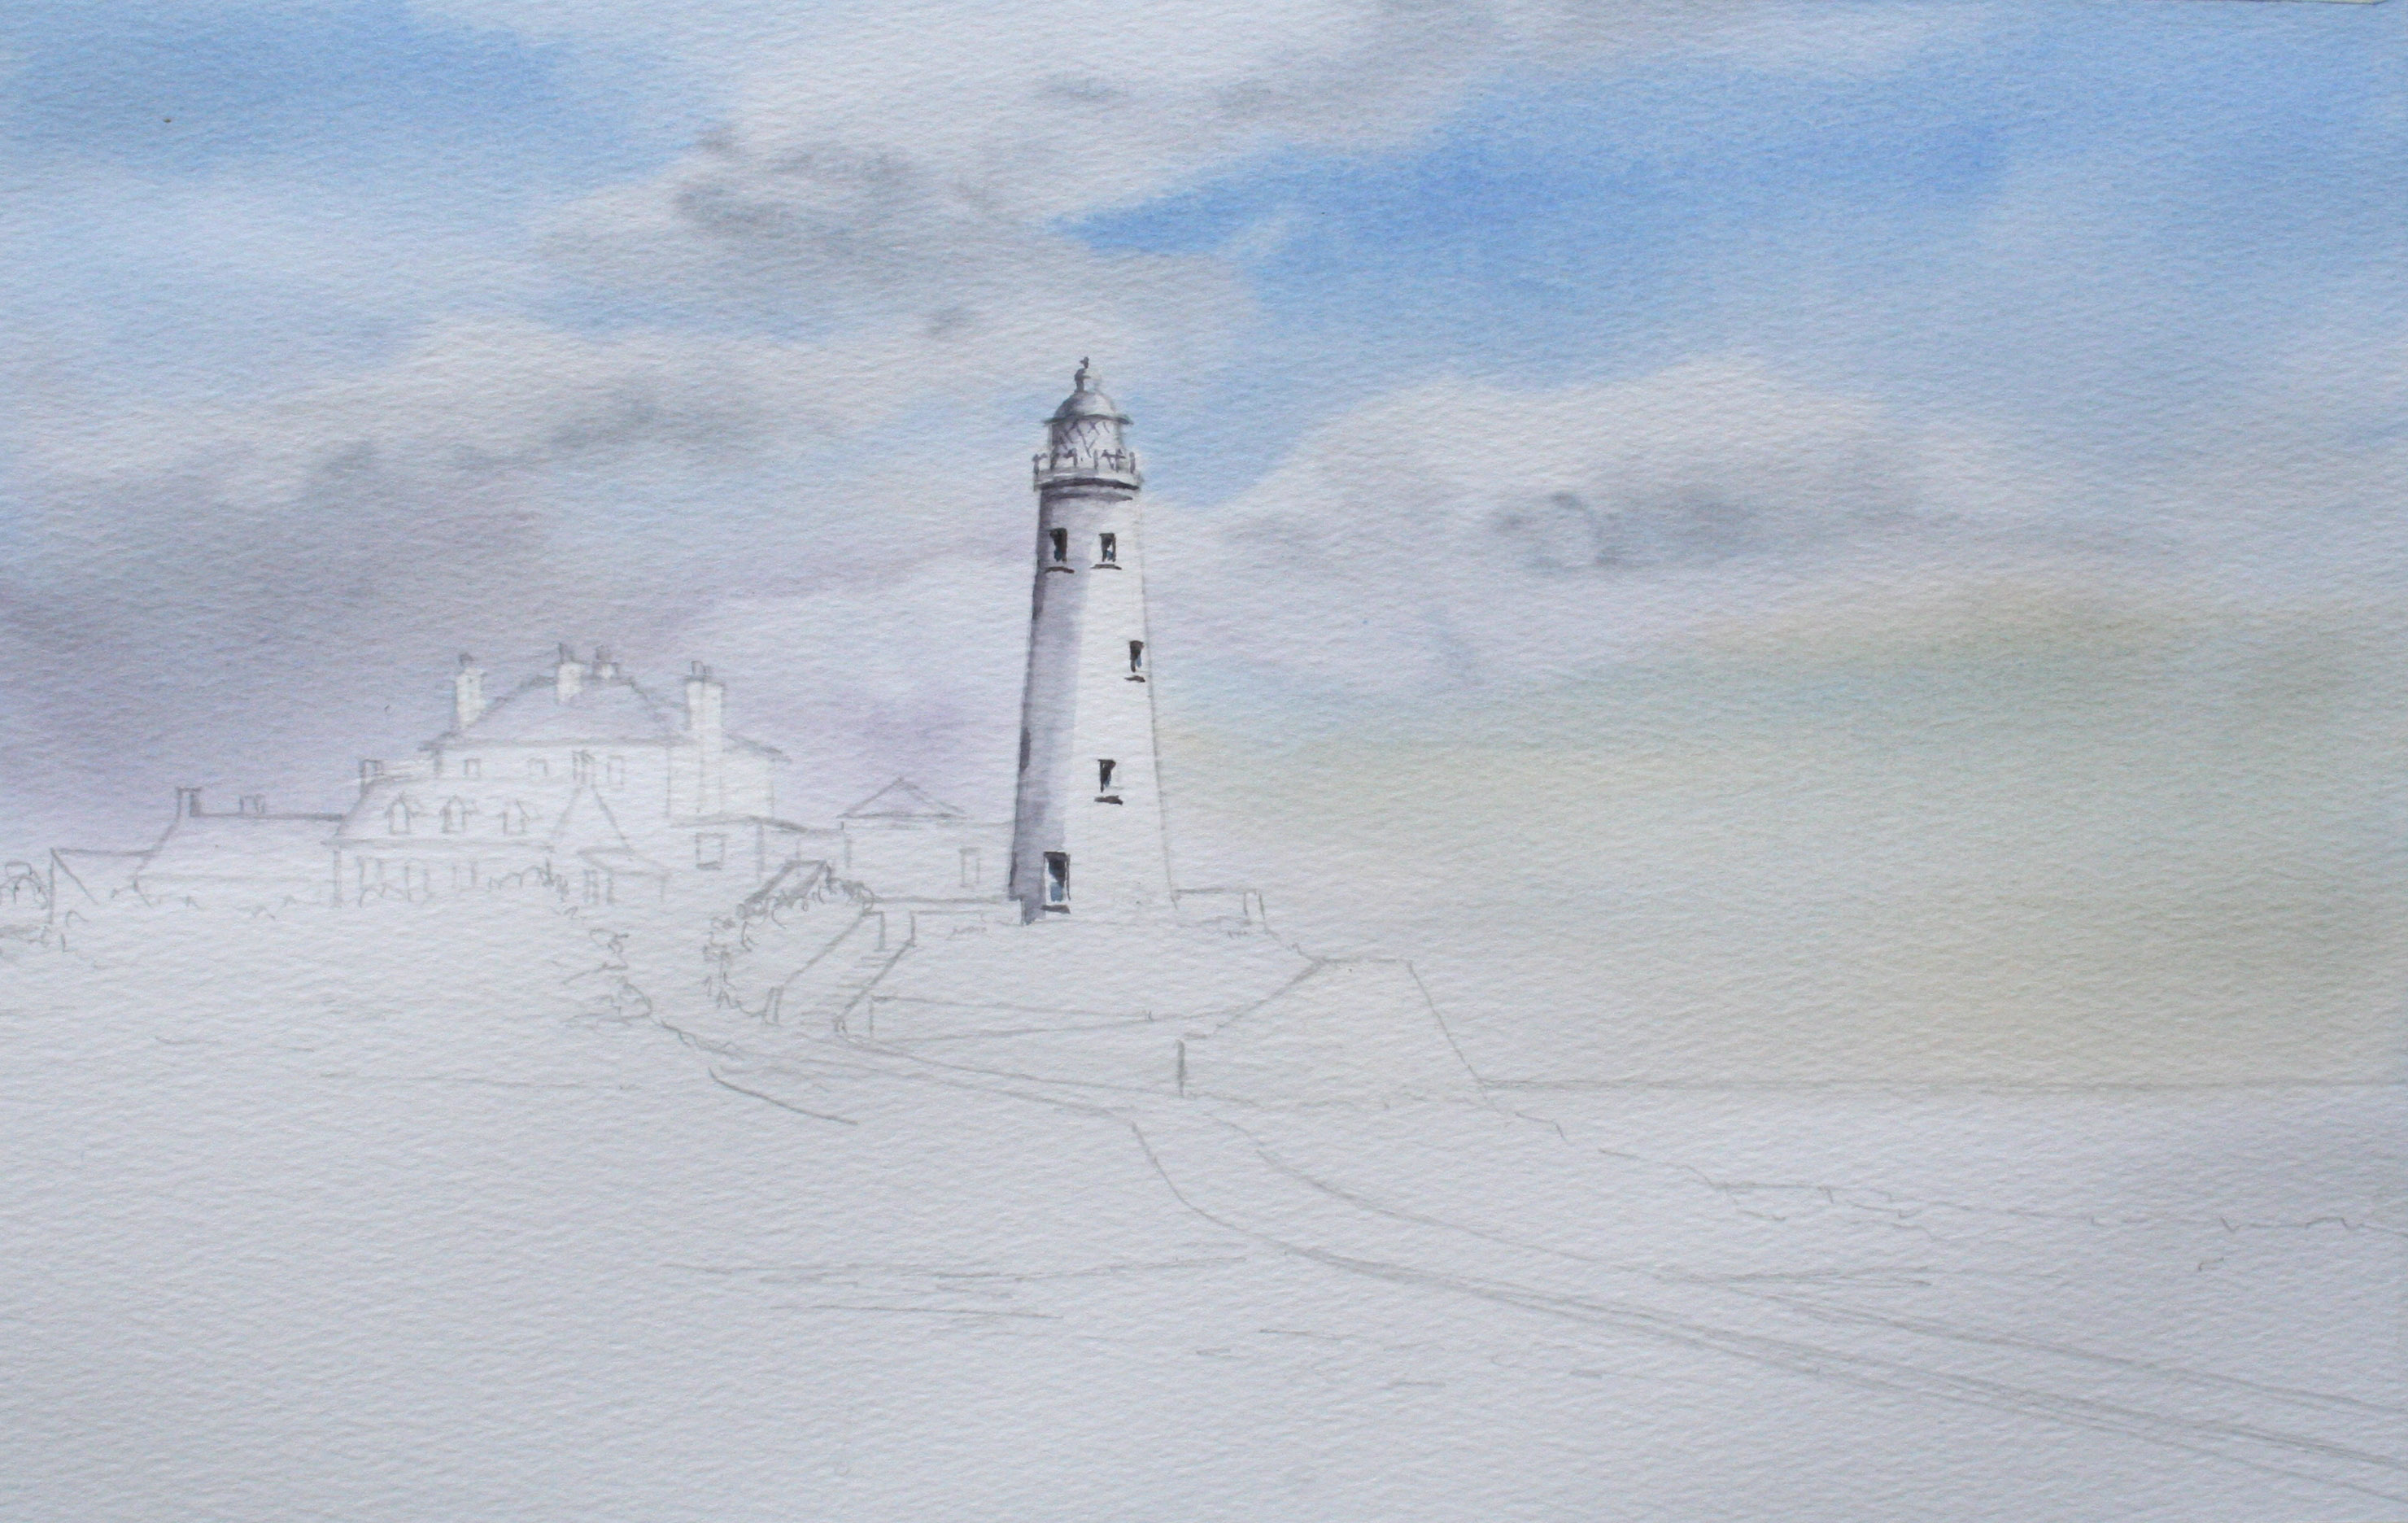
For the white buildings to the left of the
lighthouse, I have used the same mix as the shadow in the lighthouse,
just a little bit weaker. For the roofs of those buildings I have used
cobalt blue with a tiny touch of light red. You will notice that there
are some warm bits on the edges of the roofs, coping stones or whatever.
For this I have used burnt sienna, again a combination of my No.8 round
brush and my No.3 rigger. Notice how I have made the shadow darker
underneath the eaves of the building. |
For the white wall around the base of the
lighthouse and also the sea wall, I have used the same shadow mix yet
again with my No.8 round brush. Notice how I have left it white to the
extreme right-hand side at that sea wall. Always remember where your
light is coming from, and keep it coming from the same direction
throughout the picture.
For those other little buildings to the left of
the lighthouse, I have just used raw umber for the darker sides of the
buildings and raw umber mixed with the Charles Evans sand colour,
which is a specially mixed colour which comes in a tube, this has
lightened my raw umber to give me the light side of the buildings. For
the roofs I have again used burnt sienna. For the windows don’t paint
window frames just paint the frame and that is just a few blobs with the
tip of my No.8 round brush.
Again the same old shadow colour, but this
time slightly darker. For the grass beneath the lighthouse and the
bushes next to the little buildings, I firstly dropped in the yellow
ochre, good and wet, and then Hooker's green mixed with burnt sienna on top
of this so it spreads one into the other, then a few darker areas with
a mixture of cobalt blue and the tiniest touch of light red. Blue on top
of the grasses and bushes will give a lovely rich depth to them. |
|
|
|
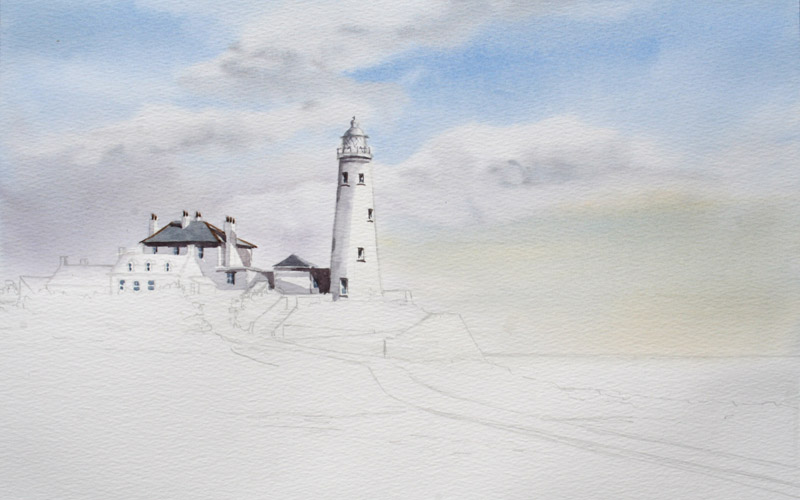
In the next stage there seems to have
been a lot done, but it's all just big quick slap it on stuff. You will
notice that I have done more bushes underneath the cottages, this done in
exactly the same way as the previous bushes and grasses. For the rocks,
now this is a very simple technique, but you have got to be quick
because it has to be finished whilst it is all still wet.
Using my ¾" wash brush, simply loosely slap on firstly yellow ochre
then raw umber, then a mixture of cobalt blue and burnt sienna to give
me nearly black. All in the rock area, filling that entire area in and
then get the edge of a credit card and scrape out the shape of your
rocks. |
|
Now for the sea. This is another
special colour readymade in a tube, the Charles Evans British sea, using
my 3/4" wash brush, simply wash in that whole area with this ready
mixed colour leaving a few white areas of paper showing here and there
to represent waves. For the path coming across from the lighthouse I
have just washed in a very weak mixture of cobalt blue and light red.
That wasn’t so difficult was it?
For the final stages you’ll notice that I have done some rock pool bits
in the middle distance area, again using the Charles Evans sea colour
and a little bit of beach which is just the Charles Evans sand on its
own and then a few more rocks in the foreground. All done in exactly the
same way as the previous rocks. And there we go my memory of a beautiful
day at St Mary's lighthouse. |
|