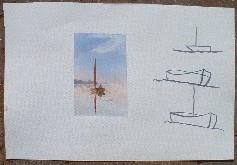
This project is slightly different to normal
in so far that it's going to be a couple of tips and techniques before the
very simple painting. I have just spent a week on a beautiful old
sailing wherry in Norfolk, with a painting group, and one of the main
questions asked was how to do boats! Now I'm not talking about the Queen
Mary up close and full frontal, I'm talking about little dinghies or
sailing boats. Stick them middle distance in your lake, river or seascape.
This means
you only have to do them small and instantly you have a fabulous and
effective focal point.....so here goes.
Essential
Supplies
The items you will need to complete this scene are as
follows:-
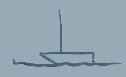
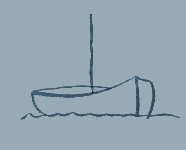
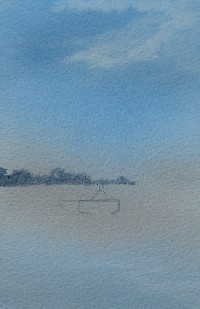
The
main problem people have is that dreaded front bit and the pointy end,
so nine out of ten painters end up sticking their boat on the lake
sideways. Yes, you have a boat of sorts, but it is flat and boring. But
really the front end of a boat is so easy to paint.
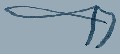
You will have seen that Christian symbol
on the back of cars called the fish. Well once you have got your fish,
all you need is a stick at the front, another shape at the side and a rounded
back end. And there we have a boat.
2
3
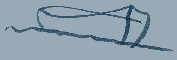
This time use your imagination and flatten the
fish slightly missing off the last bit of the tail. Another boat.
Now
another way of getting a very effective boat is to draw this shape, fig 1. Put a little bit on the side, fig 2. Stick a little
triangle on the top of the back end, fig 3, and a little knob on the top
of the triangle, fig 4.
Believe me - trust me I'm an artist - that's
enough drawing for your boat!
fig 1.
fig 2.
fig 3.
fig 4.
4
5
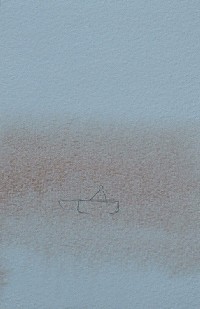
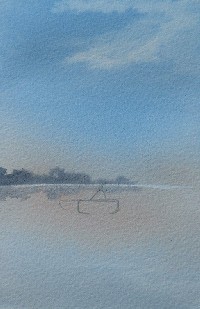
Now
I haven't really got a sky wash as such, all I'm doing is wetting the
entire piece of paper. Drop a little bit of light red in the
middle.
Now drop a touch of ultramarine blue, top
and bottom.
6
7
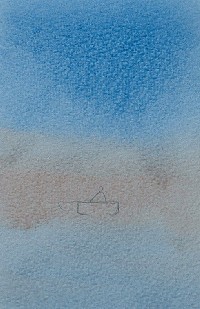
By squeezing out my brush I have taken out
some cloud.
That's the sky and lake.
The brushes I am using are a 3/4"
flat wash brush, called the Sapphire, and a No.8 round brush also a Sapphire.
With my No.8 round brush I have added a
mixture of ultramarine blue and a tiny touch of light red.
Whilst still slightly damp, I've dropped in
a line of this well watered mix.
8
9
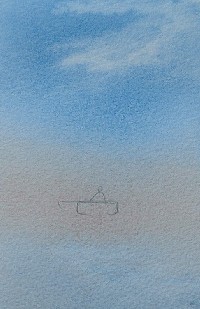
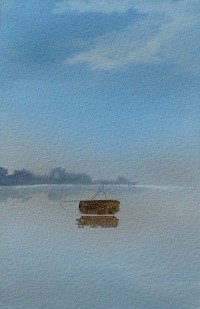
It spreads ever so slightly giving me my
distant trees and reflection. Now moving on to my 3/4" wash brush
I've
sucked out a strip of colour. I've now separated the sky from the water.
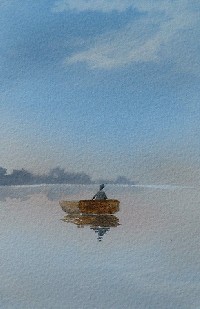
Using my No.8 wash brush and raw umber,
fairly strong, I've coloured in the back of the boat.
10
11
Now using raw umber with a
lot of water in it, I've coloured in the side of the boat, taking care to
put reflections in at the same time.
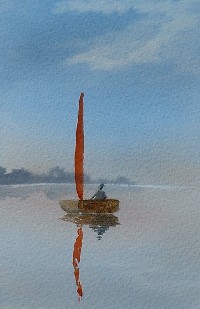
Still with my round brush,
and using a mixture of ultramarine blue and burnt sienna, I've coloured in
the little triangle and left a little slither of light to break the arm from
the body. Again add the reflection.
12
13
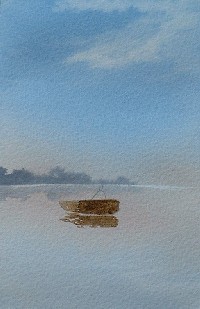
Still using the round brush, I used light
red to paint in the sail. I pressed a little harder as I came down with
the stroke causing the brush to spread a little. This gave me a wider
stroke mid-way down the sail than at the top.
Now to the right-hand edge, I've added a
mixture of ultramarine blue and burnt sienna.
Moving to my rigger brush and still
using the same colour mix of ultramarine blue and burnt sienna, I've added
a few ripples.

)