|
|
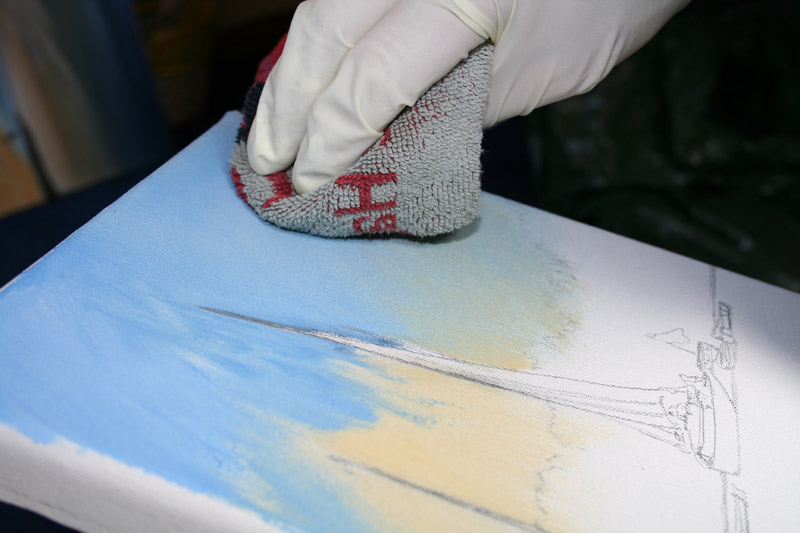
As you can see from my
outline drawing I haven’t used any charcoal or under painting, just a
normal pencil. Not too heavy a weight so that it doesn’t spread and make
mud on my canvas when I put my sky wash on. For the sky wash I have
firstly gone into the bottom area with a little bit of Naples yellow,
thinly applied, followed by cobalt blue mixed with titanium white, again
thinly applied. Now just a few touches of titanium white here and there
and for all of this I have used my No.12 filbert brush.
|
|
Now with a piece of old rag,
drag the colours together like so. And there we go a nice little sky,
not too dramatic because I don’t want this to be the main focus of
attention. |
|
|
|
When I paint oils there are
not loads of paraphernalia, I only use two things to mix my oils into,
firstly low odour thinners, so you don’t get a horrible overpowering
smell or a headache, and secondly oil painting medium. As most of you
know, all the equipment I use is Daler-Rowney and the painting medium is
a mixture of various concoctions and oils, but it just means you don’t
have to think about all the other stuff you need for oil painting. So I
just quickly dip my brush into the oil painting medium for every mix I
do.
|
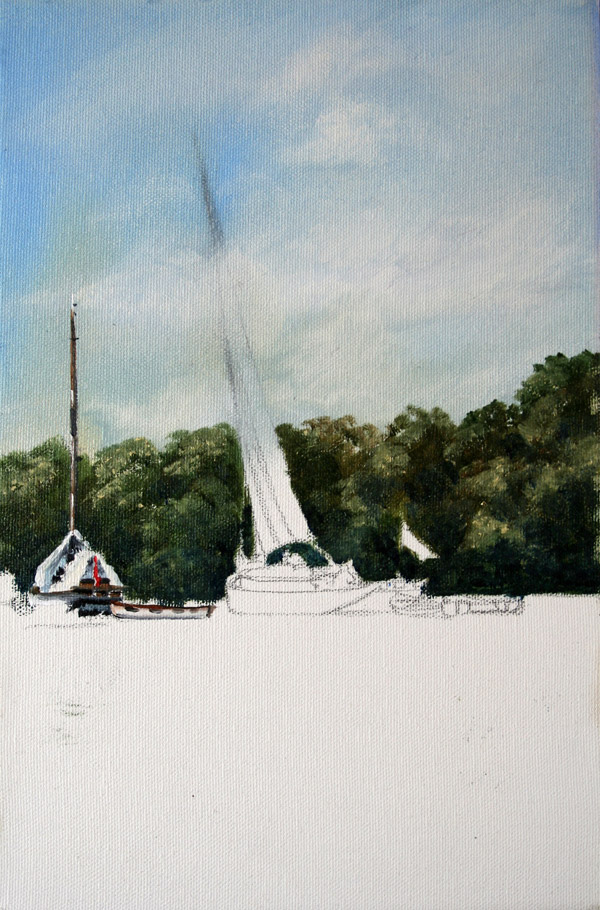
And so now speedily into the
trees.
I started off in the trees with a mixture of Hooker's green and burnt
sienna. I am using a No.3 bristlewhite chisel edged brush, this gives
some lovely control, you can get some nice sharp edges here and
there. All I am doing is stippling on with the edge of the brush,
carefully going around any areas that I still want to see afterwards.
Now on top of this green I am dropping on a little bit of Naples yellow
here and there. Now if you look at this next image, yes they are ok, but I
need a little bit more depth as all these trees come to the base. For
this added depth, still using the same brush, I am dropping in with a
little bit of cobalt blue into the base areas of the trees especially
either side of the main wherry as this will push the wherry further
forward. |
|
|
|
Now straight into the boats, I
am first doing the moored up boat on the left. I am starting off with my
rigger brush, with a mixture of raw umber and burnt sienna. For this the
mahlstick comes in handy because this helps to rest the hand without
touching the painting. With a single stroke straight downwards, fill in
the mast. Don’t hover about and don’t fiddle, a straight stroke
downwards, because otherwise you will end up with a broken or jagged
line.
Add a little bit of white on top and down the left-hand side here
and there, just to capture a little bit of light. I don’t use
manufactured black and there is a little patch of black in the middle of
this mast, so I am mixing Payne's grey with raw umber. For the rest of
the boat, most of it is canopy and so I have a little bit of titanium
white mixed with Naples yellow because I don’t want it pure white. Now
fill in the outer edges of the canopy or the lighter bits. A little bit
of cobalt blue into the white for the inner parts of the canopy. For the
boat itself titanium white and then a little bit of raw umber mixed with
burnt sienna for the wooden parts of the boat. The tender is done in
exactly the same way with the same brown and the same white. For the
flag a hint of cadmium red. All of this I did with my No.3 rigger.
Whilst I’m over that side with that boat, I am going to add a little bit
of my grasses coming up from the side of my river, which is kind of cut
up in front of the boat, slightly down to the base of where the river
will be. Now that makes some sense of where that boat is. Just add a
little bit of white to that and again I’m adding a touch of Naples
yellow.
|
|
Now it's time for the main
boat. On a wherry you have one huge sail on a single mast. And no wherry
would be complete without its pennant which are very noticeable because
they are very large. For the sail itself, I don’t want to paint
perfectly white, because of course canvas sails are not perfectly white,
so |
|
|
|
I’m a mixing a tiny touch of
Naples yellow into my titanium white followed by a tiny touch of cobalt
blue into my canvas mix, then paint into my sail to give shadow. Also a
tint of slightly different coloured canvas here and there in strips.
|
For the rest of the boat, for
the top part of the cabins I’ve got raw umber mixed with a touch of
Naples yellow. I am using my No.3 rigger, this is for the light part of
the cabin, the top bit. For the darker areas I am using my raw umber and
burnt sienna mix. To darken off the brown that I used for the cabins I’m
adding a tiny touch of Payne's grey. And of course I’ve got windows, but
don’t start painting sash windows, just a little blob of Payne's grey
here and there. For the top part of the cabins I’ve got a little bit of
cobalt blue mixed with titanium white and these represent Perspex window
bits.
Then we have the impression of a few people on the boat. One has a blue
shirt, a bit of cobalt blue mixed with titanium white. Another has a
reddy coloured shirt, I am using my cadmium red mixed with titanium
white. A bright red shirt a bit of cadmium red, and finally a brown
shirt, a bit of raw umber nice and strong. Don’t forget some hair, some
raw sienna with titanium white, so supposedly that person is blond. Also
a bit of black and raw umber. Next we need a bit of flesh tone, Naples
yellow mixed with burnt sienna.
|
|
|
|
Add a bit of rope coming up
from the base of the sail, for this I am using raw sienna with a tiny
touch of my black mix to one side.
Now for the main body of the boat. I am starting off with a little bit
of titanium white and cobalt blue mixed, because obviously white in
shadow is not white, it has a kind of blueish tint to it. The other
thing about painting oils on canvas is never leave white canvas showing,
it looks unnatural, paint your white on. For the dark end of the boat I
am putting a little bit of Payne's grey into the last mix.
For the tenders on the back of the boat, keep these simple they are not
the main part of the picture. I’ve got a little bit of titanium white
followed by titanium white mixed with Payne's grey for the rear ends. And
a few touches of titanium white here and there, just add a little bit of
light captured on top of the boats. Don’t forget a little bit of shadow
in between them which of course is Payne's grey mixed with titanium
white.
|
Now it's time for the water,
and you know what, I’m sitting here looking at the photograph of the
water, and this really is what painting does for you, because as I look
at my painting at this stage and the photograph in front of me, I really
can take myself back to that day remembering the sights, sounds and
smells, the general feeling of freshness and the creaking of that lovely
old boat. Less reminiscing, into the water.
For the water I’ve started off with cobalt blue and Payne's grey with a
tiny touch of titanium white, using my No.12 filbert to start off with,
then with my No.3 chisel edged bristlewhite, start off with a few dark
green reflections here and there. Followed by a few reflections of
titanium white. Now also some reflections of raw umber mixed with burnt
sienna and Payne's grey mixed with a touch of cobalt blue for the
reflection of the darker areas of the boats. Now to darken my blue here
and there, cobalt blue and Payne's grey and a few strokes amongst the
other reflections.
And there we go, a lovely painting of a wherry in Norfolk.
|
|