|
|
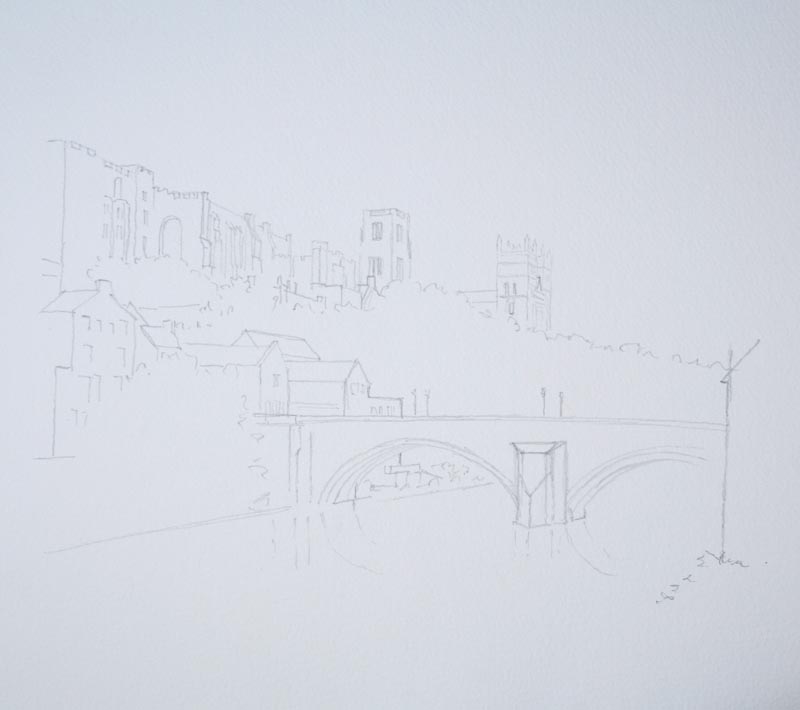
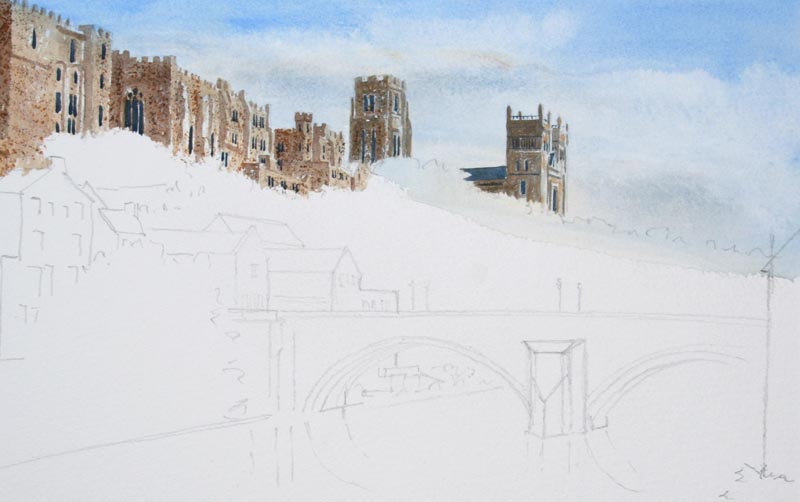
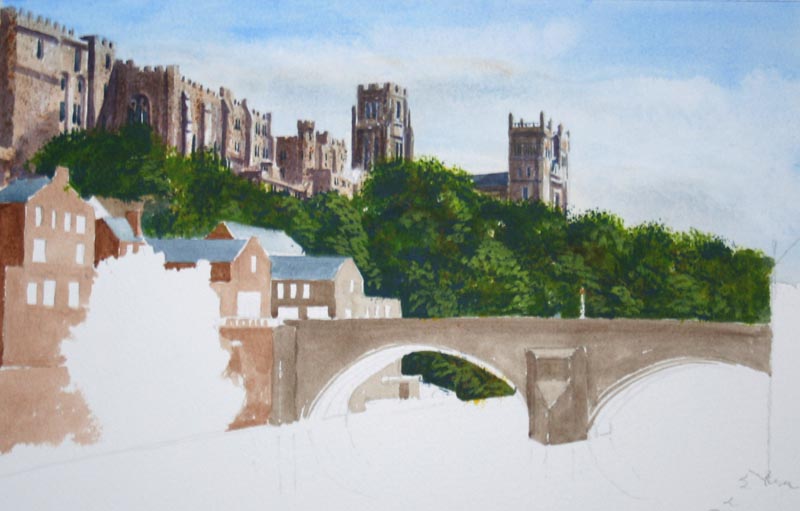
As you can see from this drawing it looks awfully complicated, that’s
because it probably is. But even though it looks complex, I’ve still just
stuck to outlines, no crosshatching, no shading, no messing. This by
the way is Durham Cathedral and Castle from the main bridge over Durham. |
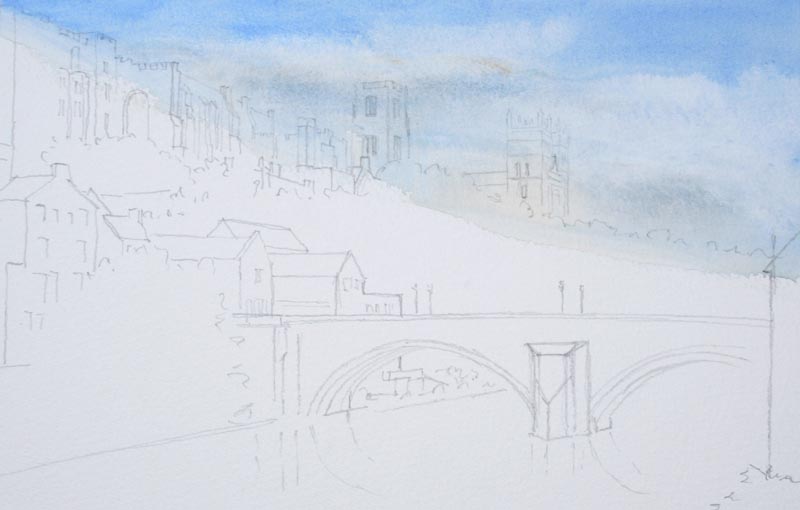
And now that I have got my outline drawn, the painting itself is
actually going to be done in System 3D acrylics. The beauty about System
3D is that it can be used either in oil style or watercolour style or a
bit of both, which is exactly what I am going to do in this picture. A
watercolour style wash for the sky and getting thicker and chunkier for
buildings coming further forward. Also for the paint I am
using on the Daler-Rowney stay wet palettes, which is to all intents and
purposes, a very simple piece of plastic, but an absolute boon for keeping
your paints moist and usable. For my sky wash I am using cobalt blue,
titanium white, a little bit of raw sienna and a little bit of Payne's
grey and so here we go. Firstly, wet the entire sky area just as in a
watercolour sky. I am not being too precise about going around buildings
and things, they are all going to be darker than my sky area anyway. But
remember System 3 acrylics are very strong in colour. Obviously there’s
a lot going on in this picture, so I don’t want to mess about too much
with a fancy sky. I just wash it on with my raw sienna in the base, and
cobalt blue in the top coming down, then finally a few shafts of grey to
indicate a little bit of cloud below my titanium white. Now let the sky
dry before going any further.
Surprisingly, I use the same brushes for my acrylics as I do in my
watercolours. For my sky wash I use my 1.5" flat wash Dalon brush, and
for the rest of the painting I am going to use my ¾" wash Sapphire
brush, my No.8 round Sapphire brush and my No.3 rigger Sapphire brush.
|
|
|
|
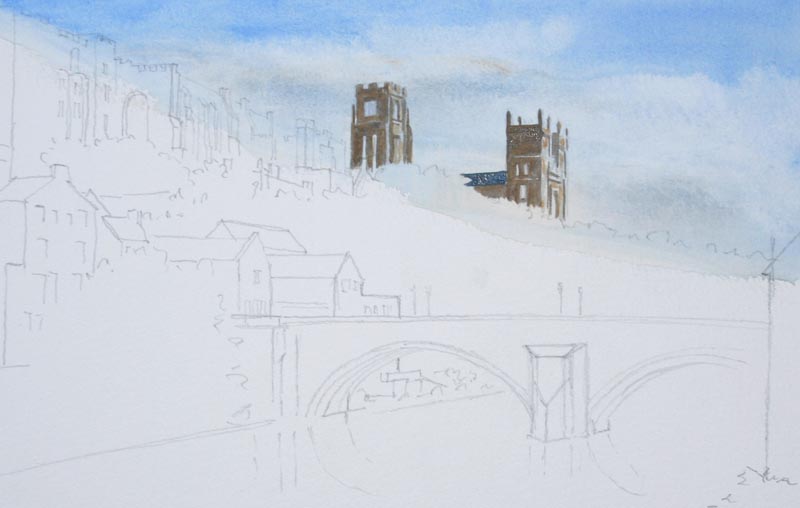
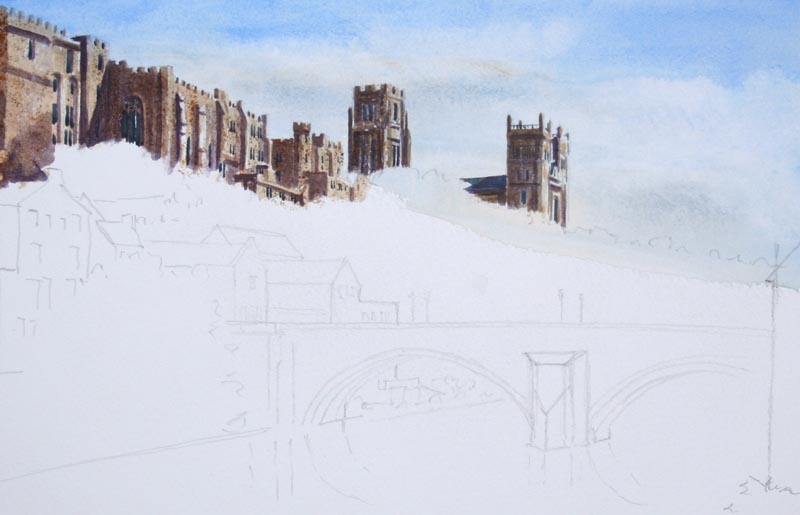
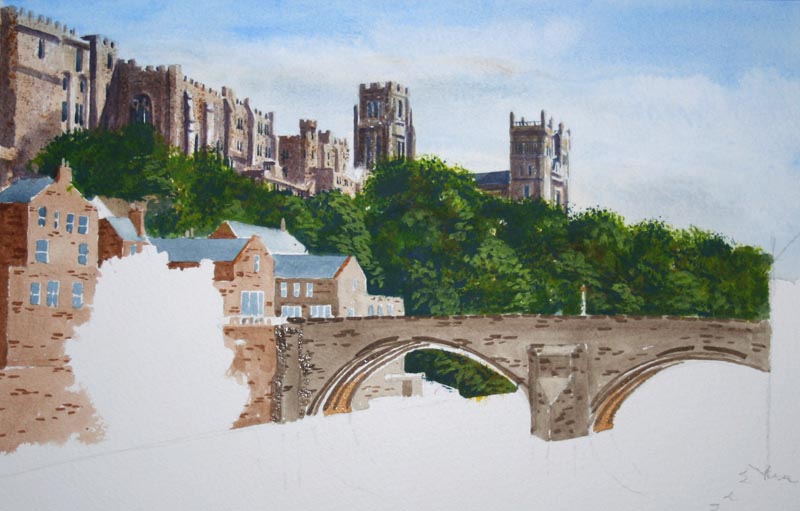
At the moment, all I am doing is building up blocks of colours within the
buildings. For the cathedral, I have used my Payne's grey mixed with
titanium white to lighten it. Then as you will notice a heck of a lot
lighter on the right-hand side where I want to catch a bit of strong
light.
|
In the next stage you will see I have done the same, but coming further
forward I’ve added a tiny touch of burnt sienna into my Payne's grey and
titanium white mix, again much much lighter on the left-hand side.
|
|
|
|
The beauty of acrylics as opposed to watercolours is that you can paint
light on top of dark. I want to give all the buildings a little bit more
texture now, so with my ¾" wash brush split, I am stippling on very
lightly a few touches of raw umber. Now as I say you stipple light on
top of dark so in the next stage I'm stippling on a few touches of raw
sienna. Finally a few touches of titanium white, just stippling very
sparingly. Now for my windows I am using cobalt blue and a touch of
burnt sienna, for all of this I am using my No.8 round brush. In general,
castles don’t have sash windows so don’t start fiddling and messing about
with fancy windows, these are blobs. |
|
Now let's give these buildings a real feel of depth. For this I am using
cobalt blue, alizarin crimson and a touch of burnt sienna. Now this is a
very bold shadow colour, be bold when you put it on. Don’t prevaricate,
be brave. Notice that on some of the buildings I have got diagonal
shadows, this is as one building casts shadow onto the next as is
actually a very effective technique, don’t over work it. |
|
|
|
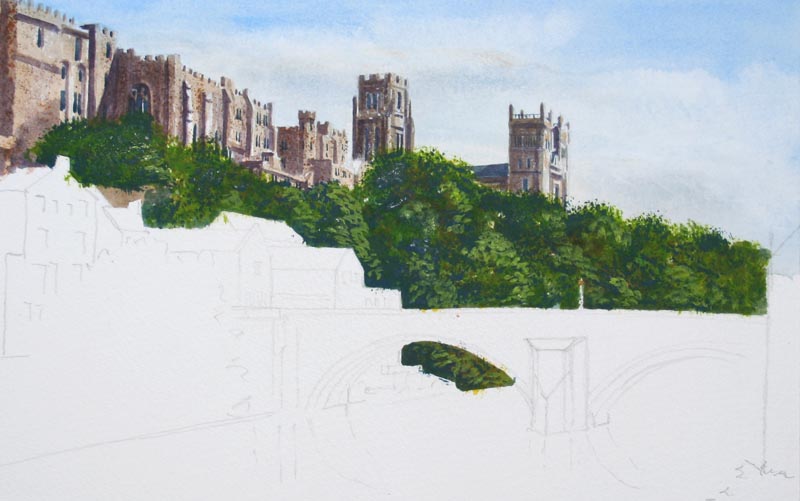
Now starting off with the trees, firstly a wash of Hooker's green mixed with a
touch of burnt sienna, but importantly remember never to use Hooker's
green just by itself, far too bright and garish. It has to be said as
I’m putting it on it looks very flat and boring, but just wait till the
magic starts to happen. Using my No.8 round brush just simply fill it
all in. There we go flat dead and boring, just a big swathe of green,
but watch what happens next. |
Once this has totally dried, again the beauty of acrylics, I’ve added
yellow with my split 3/4" wash brush and just stippled on here and there
but doing a bit of a round shape as I stipple. Now a little bit of
cadmium yellow here and there.
Now for some cadmium yellow mixed with my Hooker's green, now a little
bit of cobalt blue mixed with burnt sienna just enough to tone down the
green. Then just cadmium yellow by itself and cadmium mixed with Hooker's
green. All of these are stippled on one at a time. Finally with a little
bit of cadmium yellow, Hooker's green and titanium white and my No.8 round
brush to pull out a few individual trees here and there. |
|
|
|
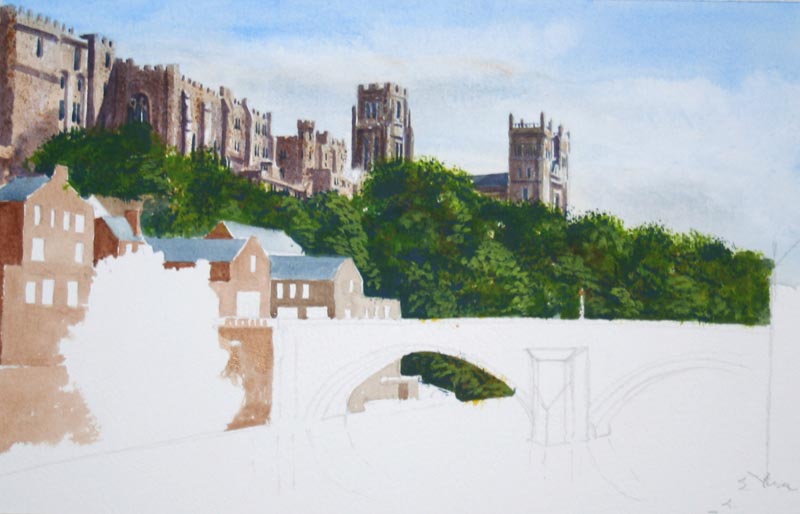
Now for the roofs of the normal buildings, a bit of my cobalt blue, burnt
sienna and titanium white, to make a kind of a slatey grey colour. For
some of the buildings I want a brick colour, for this I am using raw
umber and burnt sienna mixed.
There is a building on the bridge which is a slightly different colour
which is my grey mixed with raw umber. Notice that in all of the
buildings just as in the castle and cathedral, a lot lighter to the
right-hand side than the left, very simply it's more water. And again look at
these blocks. |
|
Whilst all this is drying I have got a little bit of my grey mixed with
raw umber for yet another block, the bridge. Just block it all in using
my No.8 round brush. A little bit more detail in the windows in the
buildings on the left, as they are closer. All I am doing is painting the
same cobalt blue and burnt sienna block, but this time leaving a little
white bar in between the two blobs in the window and I am still using my
No.8 round brush. |
|
|
|
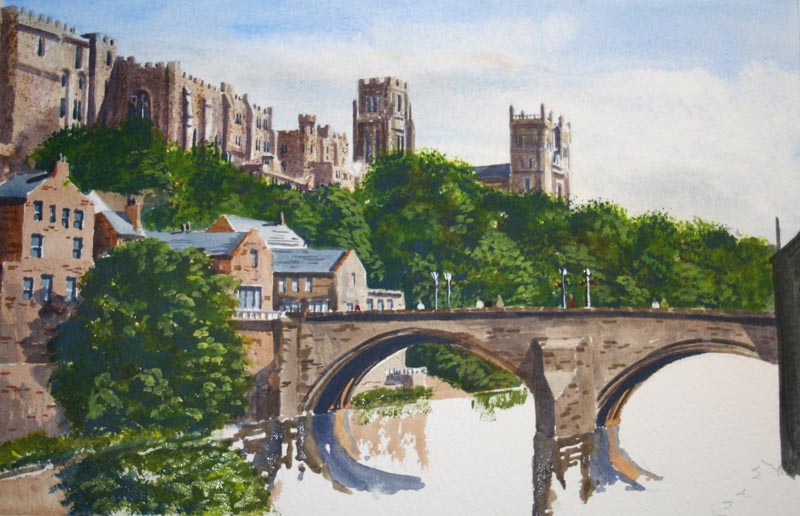
Now to do some stonework effect, a little bit of raw umber, a little
bit of alizarin crimson, darker and stronger. I’m not painting
individual stones, all I am doing is a few strokes here and there to
give the impression of bricks or stonework. Be careful at this stage,
because though effective, if you go crazy with this technique it can tend
to look like a building with chickenpox. Use the same process in the
bridge but this time using raw umber mixed with Payne's grey.
Remember don’t mess because yet again all this is going to be brought
to life with shadow. Now again my shadow, my shadow colour is cobalt
blue, burnt sienna and alizarin crimson, I use this colour simply
because it's nice and warm. Basically with shadow all you have to think
about is where you have an overhang, you need shadow. Now a good strong
shadow at the side of the windows will recess the windows back into the
building. And the light is coming from the right, so the shadow line is
going across the top and down the right-hand side. It's particularly
important to have a good strong shadow line where the roofs meet the building,
this really makes those roofs site down on the building. Interestingly,
this is quite a warm shadow because of the alizarin crimson and blue,
but if I were to be painting a winter scene it would be too warm,
therefore I would use straightforward blue and burnt sienna. One very
important shadow of course is the shadow underneath the arches of the
bridge, so I’m darkening this a touch more with a bit more burnt
sienna making a very strong and powerful colour.
|
|
Now a little bit of raw umber and cobalt blue for a very dark mix for
the lamp post on the bridge using my No.3 rigger brush. Add a little bit
of titanium white on top and down one side which will give me a touch of
light. On these lamp posts there are hanging baskets which have a very
nice little touch of red, so add a few touches of cadmium red. And add a
little bit of light just in front where it's needed in front of the dark
trees. Finally before we start into the water and the reflections, add a
few people standing on the bridge. This is the beauty of acrylics over
watercolours, you really can paint your light on top of dark. There is a
lovely flesh tone in acrylics, but quite frankly I find it just as easy since
I have all my colours to hand, to mix a little bit of raw sienna,
titanium white and alizarin crimson. |
|
|
|
There is a big building on the right-hand side, I want it good and
strong and dark; this is just a big shadowed building to keep the eye in
on the right-hand side. For this I am using a mixture of cobalt blue and
raw umber.
Now for the big tree on the left. Again with my No.8 round brush,
starting off with Hooker's green and burnt sienna, plenty of burnt sienna
into it, with my No.8 round brush simply stipple on. At this stage I
haven’t got that much water in my mix, almost treating it like oil. Also
while I’m in with this colour, I have a few grasses at the base of the
wall, again just stippling on. You will notice at this stage I am also
stippling this green to where the river will go. Also drag down a few
touches of green through, underneath the bridge. Same process with this
tree on the left, once I have got my greens on start and stipple on some
other colours, starting with Hooker's green and cadmium yellow, followed
by cadmium yellow on its own. Followed by a little bit of cobalt blue
mixed with burnt sienna, this time darker than the first mix, i.e more
burnt sienna. At this stage notice all the colours are repeated loosely
where the water is going to go.
|
One last stroke and that’s to get the water on, but very importantly,
everything else that I have just put into the water area must be totally
dry. But being acrylics this doesn’t take long, so just give it 5
minutes.
It's back to my ¾" wash brush that I turn for my cobalt blue stretch of
water underneath the bridge, coming further forward and through my
reflections. This is another beauty of acrylics, you can go through the
stuff that you have already put on and you aren’t going to smear it or
smudge it. Now I’m going to let that dry ever so slightly for a few
seconds before putting on a few touches of white here and there. Just a
few shafts of green into the water under the right-hand arch of the
bridge. Now some cobalt blue and burnt sienna for a few darker touches
all using my ¾" wash brush. Finally a few shafts of white here and there
using my No.3 rigger, and obviously this is going to be the most
effective in the darker areas so don’t go mad with it. Add a few
squiggly bits of dark paint which is cobalt blue and burnt sienna.
Finally, almost forgotten, there is a little bush poking out from the
bottom on the right-hand side. Good and dark to start with, and then just
capture a little bit of light on it here and there with cadmium yellow.
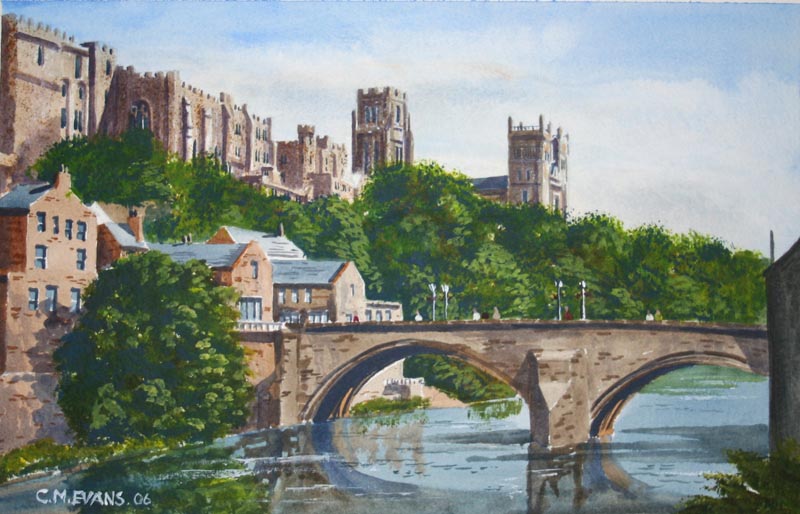
And there my friends is a view of Durham, you have thought fairly
complex but actually when done stage-by-stage like this, it's just a
series of blocks. |
|