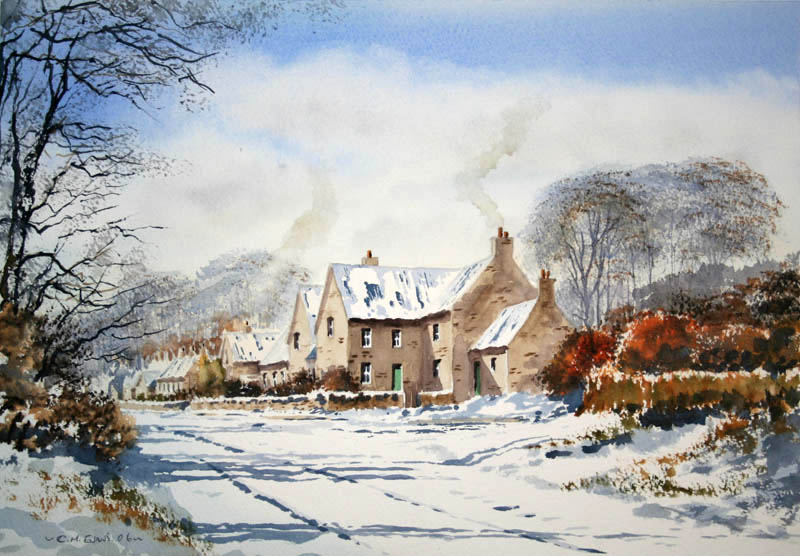
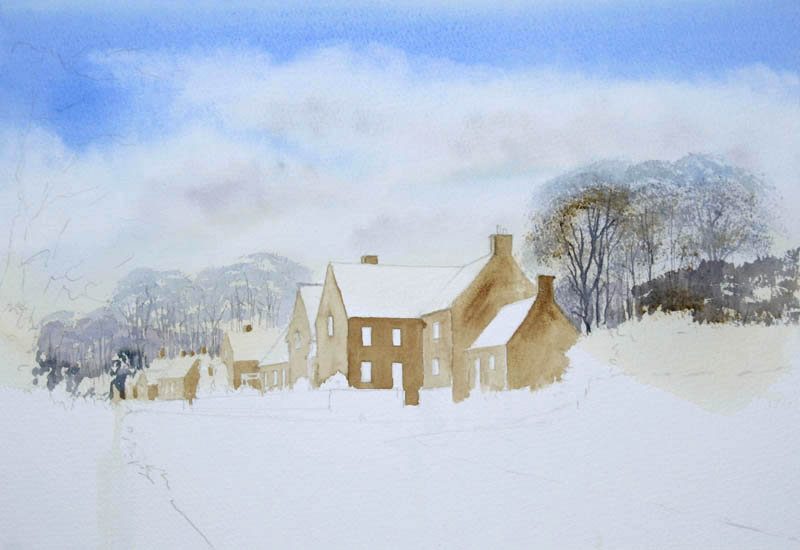
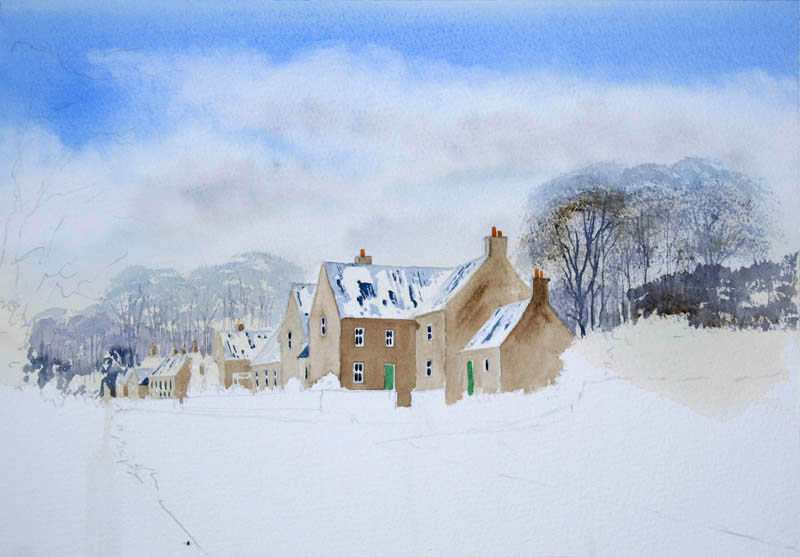
Acklington Village, Winter Scene
| STAGE BY STAGE | ||||
|
Acklington Village, Winter Scene
| STAGE BY STAGE | ||||
|
|
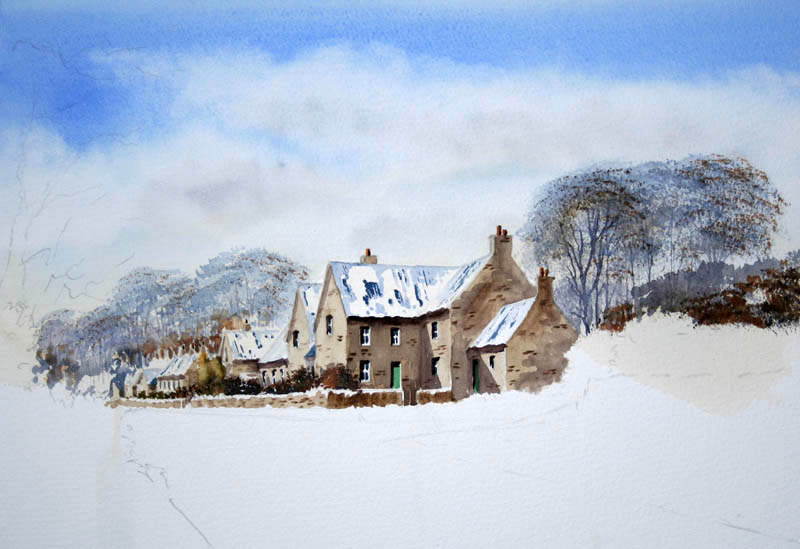
Step 1 :
|
||
|
Step 2 :
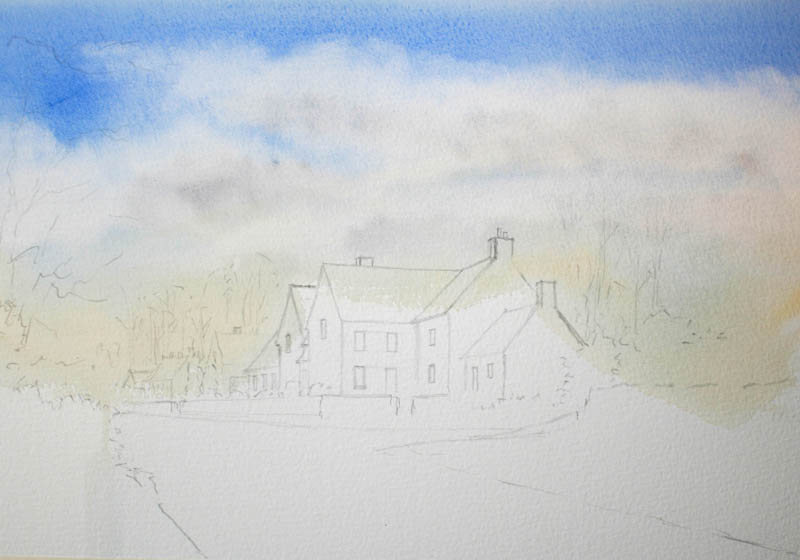
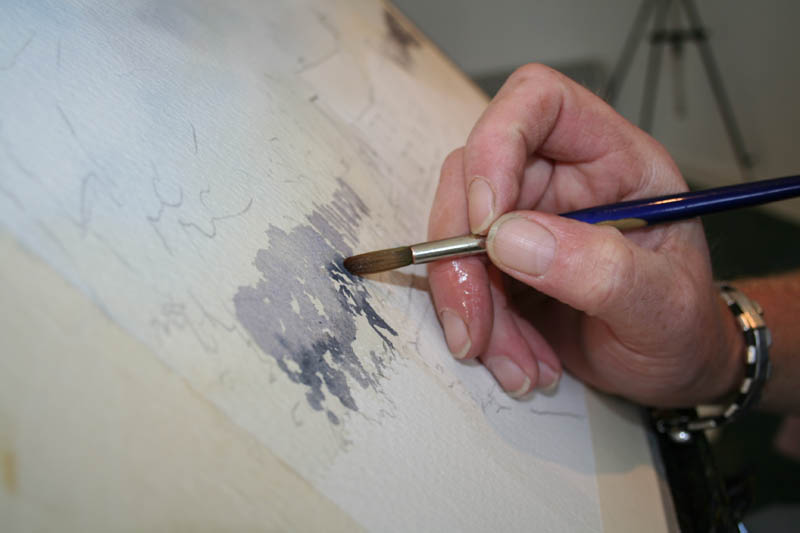
For the sky wash I want to keep it bright but obviously quite cool because its winter. So as normal starting off with loads of water using my 1.5” wash brush, which is a Dalon and totally synthetic. In with a little bit of Yellow Ochre mixed with Burnt Sienna but heavier with the yellow. Now Ultra Marine Blue remembering that its going to dry 50% lighter than when I put it on, so don’t be afraid pf the strength of colour. Remember don’t mess about with this sky for too long because this could lead to cauliflowers. Now I’m putting a tiny touch of Light Red into my Ultra Marine Blue and dropping in some cloud shadow in the base of the white clouds. Then let the whole thing dry. |
|
||
|
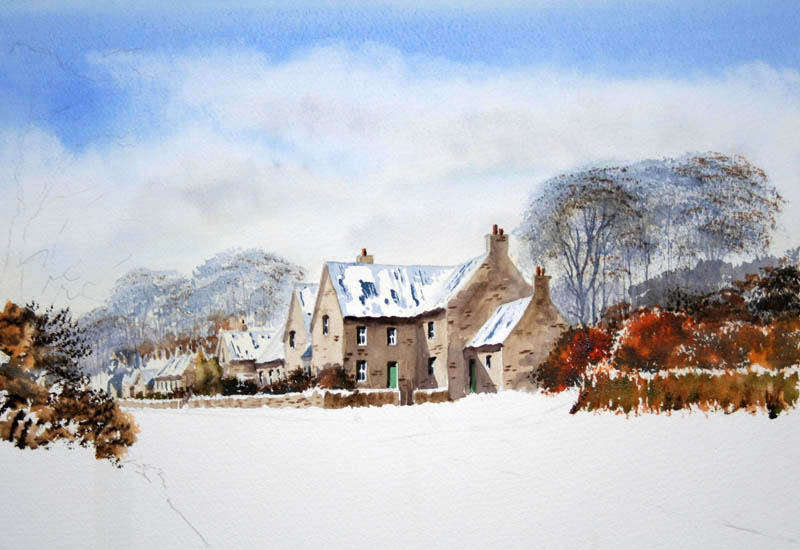
Once my sky is more of less dry I am going to drop in my far distance. I have got a mix of Ultra Marine Blue with a tiny hint of Alizarin Crimson and a tiny hint of Burnt Sienna. Put this into the far distance areas to give the impression of distance trees, bushes etc and this is all done with a No 8 round brush which is part of my set of sapphire brushes which is a mixture of better quality stable and synthetic. |
||
|
The next bit if to get in there with some chunkier foreground trees, but more distinct, but even with these I don’t mess about too much. Now I am going in with my No 3 rigger brush with a mixture of Ultra Marine Blue and Light Red. Remember a tree grows upwards from the ground so I am painting it that way with a stroke of my rigger brush coming up and leaving some light here and there. You’ll notice while I painted the distant trees, I left touches of unpainted paper, this is given me my light strokes within the trees. A few of these strokes in amongst the distant bushes that I did earlier but notice on this block that I am doing on the right hand side, the trees get fainter in tone as they go further away. Now I have painted a few twigs, but only a few, but of course on the canopy of a winter tree there are millions of twigs. Don’t start and paint them all, instead still using the same colour mix but my ¾” wash brush stipple on giving the impression of my canopy of trees. Now a tiny touch of raw umber and yellow ochre mixed just stipple here and there to capture a little bit of light. And there we go a clump of fairly distinct trees on the right hand side. Now a little bit more of the same over to the left but of course getting slightly weaker because all of this is further away. Don't worry if your palette looks like mine. Its all part of being an artist. |
|
||
|
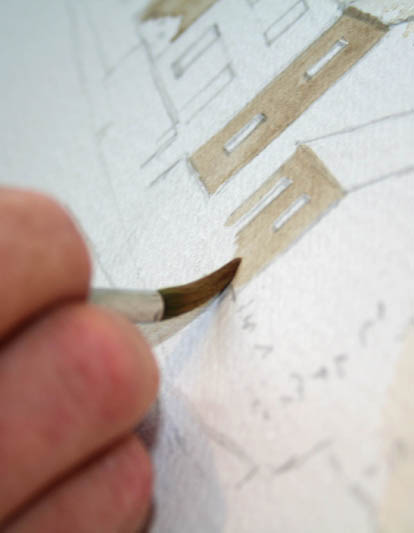
Step 5 : Now for my buildings, the light on this painting is coming from the left. So obviously I want lightest colour of my buildings on the left hand side of the buildings. I am using the Charles Evans Sand mixed with a tiny touch of Raw Umber, for this I am using my No 8 round brush. Once I have painted the left hand side of the foreground buildings its time to move onto the darker side of the buildings. Fairly obviously really, Charles Evans Sand with a little bit more Raw Umber mixed into it. Noticing of course I am painting around my windows. Notice that I am not doing the building stone by stone rather just going on in blocks, remember you’re not building this thing, just painting it, give the impression of stone work later. Again even the dark tone gets weaker as I go further away into the distance. |
||
|
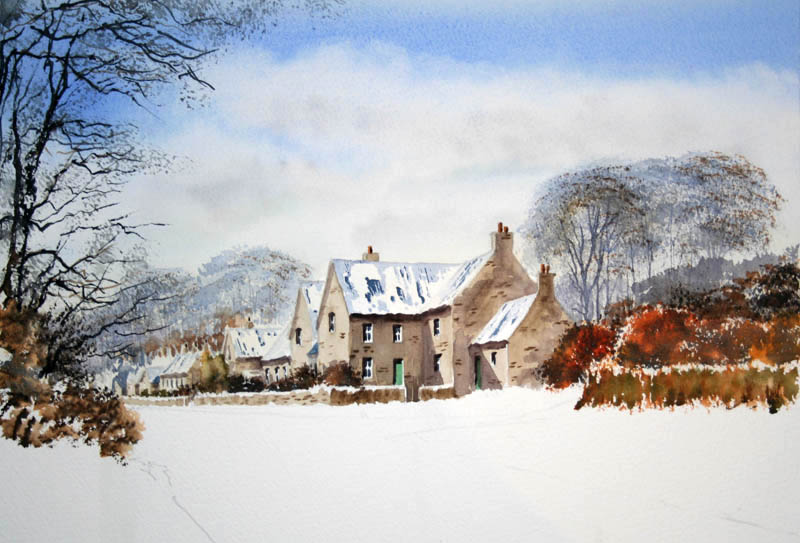
For the roves I have used a mixture of Ultra Marine Blue and Light Red and then a few strips here and there of the same colour just slightly darker. Notice at this stage I have put in a few chimney pots using a very weak mixture using Burnt Sienna and Yellow Ochre. For the windows, remember paint the window frame no the pane, for this I need four blobs within the white blocks which are left for the window, remembering to leave a little bit of white showing in between each blob. Blobs and blocks isn’t this technical. The brush I have used for this is my No 8 round. For the door I am using Hookers Green straight from the tube, plenty of water in it but no other colour mixed in. At the moment they all look a bit stark, and sitting on top of the building rather than being recessed into the building but it will be the shadow that recesses them and gives it life. For stone work in the building don’t start and do a million stones because this is where if you’re not careful the building will look like something with chicken pox, instead, a few strokes using my no 8 round brush and raw umber, will tell the eye that it is stone. |
|
||
|
Step 7 : |
||
|
Step 8 : Now before I do the shrubs and various bits and pieces in the front of the houses, I need to do the walls in front of them. So I am keeping this the same colour as the buildings but leaving quite a lot of white paper showing on the tops to give the impression eventually of snow on top of the walls. Also you will notice that on the base of the walls I am not giving it a perfect straight base so that I can give the impression of the build up of snow underneath the wall. Again making sure that my colour gets weaker as I get further away. But notice as well, like the buildings the right hand side of the wall as it turns the corner is darker than the front bit of the walls. This gives me the feeling that I have turned the corner. Likewise in the wall a few tiny touches of stone work using Raw Umber with my No 8 round brush. It seems strange that there are some green things around in the front of the buildings, but these are every green shrubs, how do I know that, you may ask, quite simply because its front garden. But I don’t want it to be too bright a green so I am tapping a little bit of Yellow Ochre here and there and merge the colours together. Now for more shrubs which are not evergreen I am going in with a touch of Ultra Marine Blue and Burnt Sienna fairly strong and a few touches of Yellow Ochre here and there just to capture a little bit of light. By putting these in and leaving a little white sandwich on top of the white, it looks like I’ve got snow on top of my walls. |
|
||
|
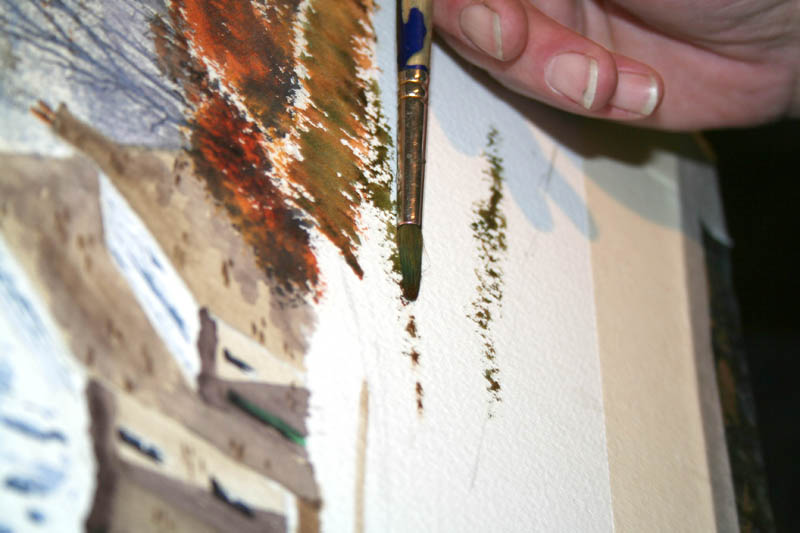
Step 9 : Now for the bushes to the side of the buildings with my 3/4 “wash brush I am stippling on firstly with burnt sienna then a touch of yellow ochre then a mixture of ultra marine blue and burnt sienna but also leaving a few touches of white paper showing. I have a hedgerow underneath this and I want a hint of green in it but obviously not too much so firstly using a mixture of Burnt Sienna and Yellow Ochre and my 3/4 “ washrbrush stroke over picking up the surface of the paper which incidentally is the Langton Rough 140lb weight a very inexpensive but supremely hard wearing paper and the one that I use everyday of my life. On top of this mix, a few strokes of raw umber and a tiny touch of hookers green mixed with burnt sienna. I am going to do this the same over to the left hand side of my painting for the bits of rough stuff coming out at the base of my trees. |
||
|
Step 10 : I have a big foreground tree over to the left that I just want to kind of poke into the picture. To start with, I go to my rigger brush and Raw Umber and a mixture of Ultra Marine Blue and Burnt Sienna. Don’t fiddle about with this even though its probably the most detailed tree in the picture its still just a few squiggly lines with my rigger brush then stippling on with my 3/4 “ wash brush. A rigger brush is a lovely flicky bouncy brush don’t hold it at the end trying to hold it straight, hold it further back and let the thing flick about on you and you will see what lovely twigs it creates. |
|
||
|
Step 11 : Now for the ground work, first of all I want a couple of strokes of Raw Umber here and there to represent where the snow hasn’t hit the curb before actually starting on the snow, also underneath the snow there are going to be a few touches of grasses poking through here and there. I am just using the side of my no 8 round brush and dragging up, picking up the surface of the paper. Now to my 3/4 “ wash brush its time for snow. Don’t leave to many bits of white showing through. With a mixture of Ultra Marine Blue and Burnt Sienna, but mainly blue, with my 3/4 “ wash brush a few loose strokes here and there. Now I am making the blue mix slightly stronger on the burnt sienna and I’ll have a few darker stroke in amongst my snow. Remember snow in shadow is not white. An easy way to add life to a painting without actually having to paint people is to have a few little bits of smoke coming out of the chimneys. And there we go, one finished winter village scene. |