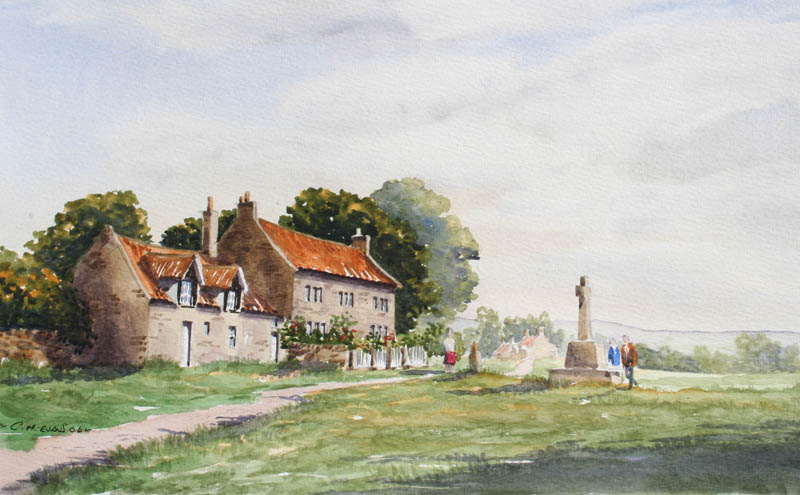
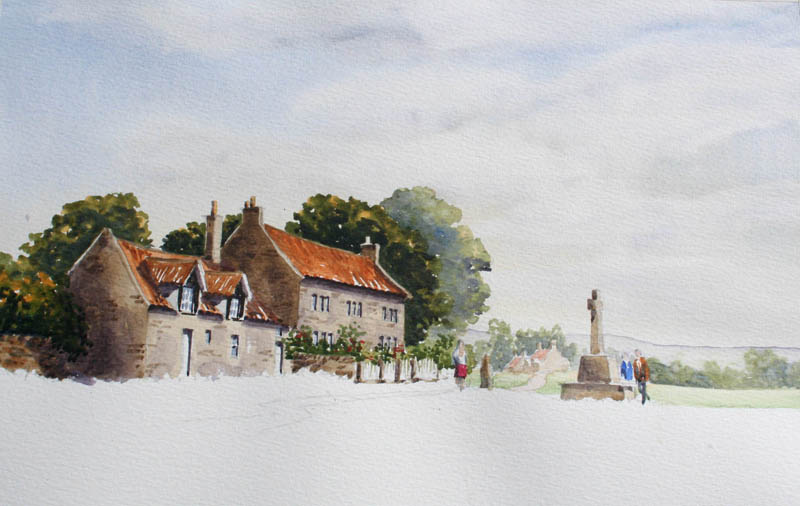
Goathland
| STAGE BY STAGE | ||||
|
Goathland
| STAGE BY STAGE | ||||
|
|
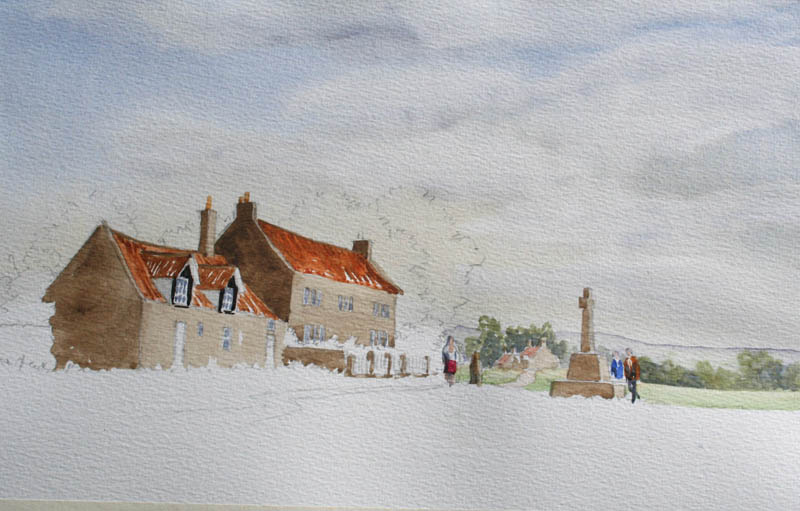
Step 1 :
As you will see
from the first image I have a very simple outline drawing then using
1.5” wash brush pre wet the entire sky area dropping a tiny touch of
Yellow Ochre on the bottom part of the sky then the colour being Cobalt
Blue coming in form the top all the way through. |
|
|
Step 2 : For my distance hills I have changed to my 3/4” wash brush and again a little bit of Light Red into my blue and fill in my distant hills. Remember to keep this weak for the hills as it is a long way away and I don’t want to bring it too far forward. For those distant trees using my no 8 round brush firstly some well watered Yellow Ochre followed by a little bit of Hookers Hreen and Yellow Ochre. In the base of the trees drop in a tiny touch of Cobalt Blue, this will add a little bit of depth without going mad with detail. For that distant field, a tiny touch of Hookers Green in my Yellow and a quite a big swath across beneath the trees. All this is done whilst the trees are still damp so that the colours soften into each other slightly. But at this stage you shouldn’t be fiddling and messing about with any of this stuff, put it on quickly as its distance. |
 |
|
|
Step 3 : For all of the building work and stone work I have used a mixture of the Charles Evans Sand with a touch of Raw Umber. At this stage you should be clear where your light is coming from. So you will see that in this picture the light is coming from the right. Notice how the little buildings in the far distance are mucb much weaker, simply add a lot more water to your mix, for all of this I have used my No 8 round brush. For the roves I have used Burnt Sienna with a tiny touch of Raw Umber into it and plenty of water again using my no 8 round brush. Remember to leave a few touches of white paper showing through here and there just to capture a bit of light. You’ll notice on the dorma windows I have used a mixture of ultra Marine Blue and Burnt Sienna to make a black, at this stage I haven’t gone into any detail at all with my buildings, simply washes. For the people, the easiest way of mixing a flesh tone is Yellow Ochre with a tiny touch of Alizarin Crimson and a pin head of blue. But mixing a flesh tone really is the easiest colour in the world. Flesh, your covered with the damn stuff mix a mix, paint it on your hand, and if you cant see it anymore, you’ve got your flesh tone. For the clothing you really can use any colour that you want, but if you are going to use black for the legs as I have done, it’s a mixture of Ultra Marine Blue and Burnt Sienna. |
|
|
For the stone work in the building, it’s a little bit of Raw Umber and using my no 8 round brush, just a few strokes to represent a little bit of stone work. Remember your not building this house your painting it. So don’t go in stone by stone, just a few, otherwise you may end up with a building that looks like it has chicken pox. For the windows, a mixture of my blue and Burnt Sienna and just a few daubs here and there, remember you are just painting the panes, not the frames. Now its time for the thing that gives a building depth and character, the shadow. For this I have used a mix of Cobalt Blue, Alizarin Crimson and a touch of Burnt Sienna. Notice I have got a strong shadow across the top of each window, across and down the right hand side. And also a good strong shadow underneath where the roof meets the building. Now lets make that building really stand out with the trees behind it. I have gone back to my 3/4” wash brush, firstly with a little bit of Yellow Ochre in the tops of the trees, to capture a little bit of light, then a mixture of Hookers Green and Burnt Sienna, all whilst the yellow is still wet. Let the colours merge together. Finally where the building joins the trees drop in some of my Cobalt Blue good and strong into the tree. And then with a damp brush spread the blue upwards into the rest of the tree, but strongest round the edges of the building . Now look how that makes the building stand out. |
|
|
|
Step 5 : For the shrubs in front of the house add a little bit of Yellow Ochre here and there followed by Hookers Hreen, and a little bit of Hookers Green and Yellow Ochre. For the few flowers a few pin head of Alizarin Crimson. |
|
|
Now for the big swath of green in the foreground. I’m using a lot of water in these mixes, putting them on very quickly in big loose strokes. Firstly Yellow Ochre then whilst this is still wet Hookers Green and Burnt Sienna. Let the colours run together giving you a softer effect. At this stage don’t get tied into individual blades of grass, let it dry and then in with some shadow, which will give it a little bit of undulation and the effect of a little bit of detail in the foreground. That shadow colour again Cobalt Blue, Alizarin Crimson and Burnt Sienna. |
|
|
|
Step 7 : |